Audi Q5: Overview - Seat Pan Cover and Cushion
Overview - Cover and Upholstery, Standard, Comfort, Folding Seat
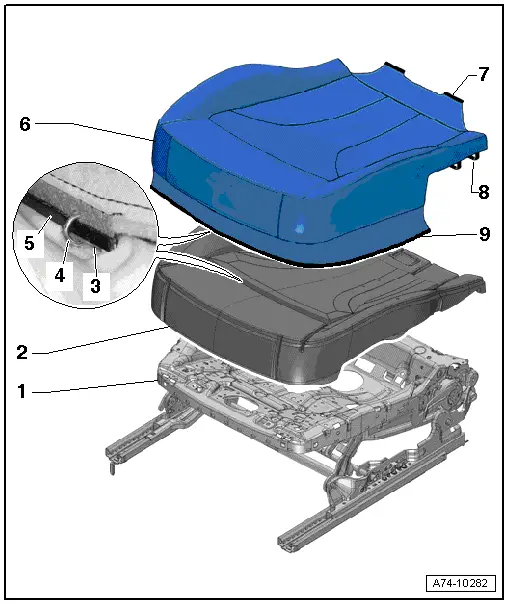
1 - Lower Seat Frame
2 - Cushion
- With foam-encased wire
- Cover with upholstery, removing and installing → Chapter "Seat Pan Cover and Upholstery, Removing and Installing, Standard, Comfort Seat"
- Cover, Separating from Cushion and Connecting. Refer to → Chapter "Lower Seat Frame Cover and Cushion, Separating, Standard, Comfort, Folding Seat"
3 - Wire
- In foam in upholstery
- For securing cover to upholstery
4 - Cushion Clip
- For securing cover to upholstery
- Always replace if removed
- Install in same location as before removal
5 - Contour Strip/Contour Wire
- Contour wire installed into the cover pocket (on the Comfort seat only)
- Contour strip sewn into the cover
- For securing cover to upholstery
6 - Cover
- Cover with upholstery, removing and installing, standard/comfort seat. Refer to → Chapter "Seat Pan Cover and Upholstery, Removing and Installing, Standard, Comfort Seat".
- Cover with upholstery, removing and installing, folding seat. Refer to → Chapter "Lower Seat Frame Cover and Cushion, Removing and Installing, Folding Seat".
- Cover, Separating from Cushion and Connecting. Refer to → Chapter "Lower Seat Frame Cover and Cushion, Separating, Standard, Comfort, Folding Seat"
7 - Clamping Strip
- Sewn into cover
- For attaching the rear cover to the upper seat frame
8 - Rubber Strap
- Quantity: 2
9 - Clamping Strip
- Sewn into cover
- For attaching the cover on the front and side areas of the upper seat frame
Overview - Lower Seat Frame Cover and Cushion, Sport Seat
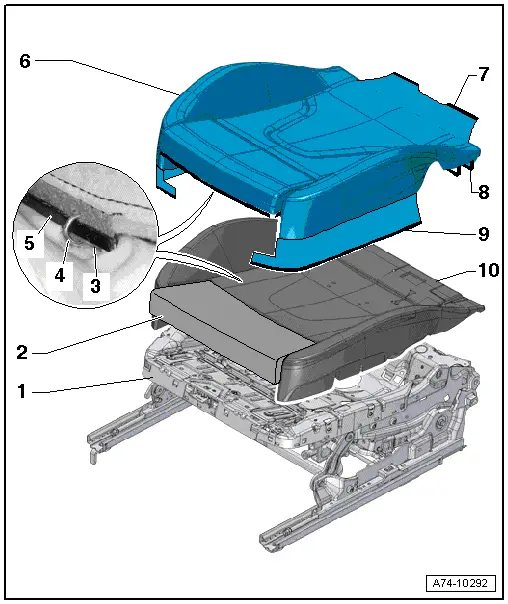
1 - Lower Seat Frame
- With a seat depth adjuster
2 - Cushion
- For seat depth adjustment
3 - Wire
- In foam in upholstery
- For securing cover to upholstery
4 - Cushion Clip
- For securing cover to upholstery
- Always replace if removed
- Install in same location as before removal
5 - Contour Strip
- Sewn into cover
- For securing cover to upholstery
6 - Cover
- Removing and installing. Refer to → Chapter "Lower Seat Frame Cover and Cushion, Removing and Installing, Sport Seat".
- Cover, Separating from Upholstery and Connecting. Refer to → Chapter "Lower Seat Frame Cover and Cushion, Separating, Sport Seat".
7 - Clamping Strip
- Sewn into cover
- For attaching the rear cover to the upper seat frame
8 - Rubber Strap
- Quantity: 2
9 - Clamping Strip
- Sewn into cover
- For attaching the cover on the side of the upper seat frame
10 - Cushion
- For the lower seat frame
Overview - Backrest Cover and Cushion
Overview - Backrest Cover and Cushion, Standard, Comfort, Sport Seat
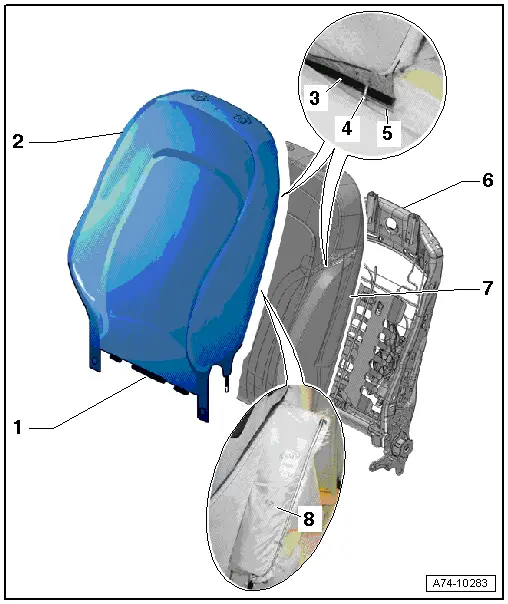
1 - Clamping Strip
- Sewn into cover
- For attaching the cover on the rear backrest frame
2 - Cover
- Cover with upholstery, removing and installing. Refer to → Chapter "Backrest Cover and Upholstery, Removing and Installing, Standard, Comfort, Sport Seat"
- Cover, Separating from Cushion and Connecting. Refer to → Chapter "Backrest Cover and Cushion, Separating"
3 - Contour Strip
- Sewn into cover
- For securing cover to upholstery
4 - Cushion Clip
- For securing cover to upholstery
- Always replace if removed
- install in same location as before removal
5 - Wire
- In foam in upholstery
- For securing cover to upholstery
6 - Backrest Frame
7 - Cushion
- Cover with upholstery, removing and installing. Refer to → Chapter "Backrest Cover and Upholstery, Removing and Installing, Standard, Comfort, Sport Seat"
- Cover, Separating from Cushion and Connecting. Refer to → Chapter "Backrest Cover and Cushion, Separating"
8 - Pocket
- For side airbag
- Sewn into cover
Backrest Cover and Cushion, Assembly Overview, Folding Seat
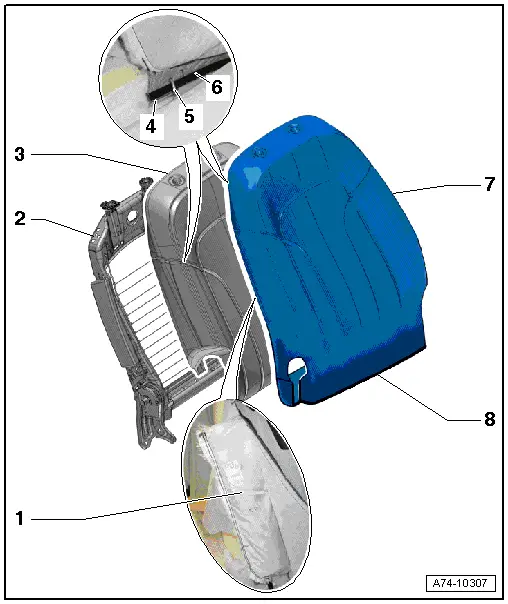
1 - Pocket
- For side airbag
- Sewn into cover
2 - Backrest Frame
3 - Cushion
- Cover with upholstery, removing and installing. Refer to → Chapter "Backrest Cover and Cushion, Removing and Installing, Folding Seat"
- Cover, Separating from Cushion and Connecting. Refer to → Chapter "Backrest Cover and Cushion, Separating"
4 - Wire
- In foam in upholstery
- For securing cover to upholstery
5 - Cushion clip
- For securing cover to upholstery
- Always replace if removed
- Install in same location as before removal
6 - Contour Strip
- Sewn into cover
- For securing cover to upholstery
7 - Cover
- Cover with upholstery, removing and installing. Refer to → Chapter "Backrest Cover and Cushion, Removing and Installing, Folding Seat"
- Cover, Separating from Cushion and Connecting. Refer to → Chapter "Backrest Cover and Cushion, Separating"
8 - Zip Fastener
- Close the zipper. Refer to Parts Catalog
Overview - Headrest Cover and Cushion
 Note
Note
A leather headrest is shown in the illustration. Because the headrest with fabric cover is not disassembled, that version is not shown in the assembly overview.
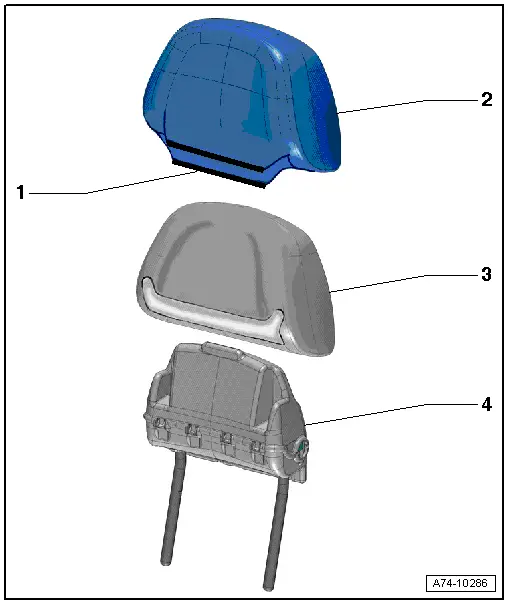
1 - Locking Strip
- Flat strip and U-strip
2 - Cover
- Vehicles with: Leather cover
- Removing and installing. Refer to → Chapter "Headrest Cover and Cushion, Removing and Installing".
 Caution
It is only possible to replace the cover on the headrest with a leather cover. It is not possible to replace a fabric headrest cover because the cover is filled with foam and also serves as the casing for the upholstery.
3 - Cushion
- Vehicles with: Leather cover
- Removing and installing. Refer to → Chapter "Headrest Cover and Cushion, Removing and Installing".
4 - Headrest Support

