Audi Q5 Owners & Service Manuals

Audi Q5: Socket

12-volt sockets

Electrical accessories can be connected to every 12-volt socket.

Seats and storage
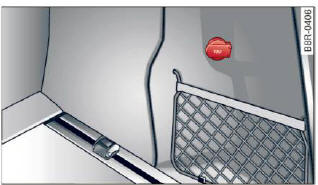
Fig. 91 Sect ion of the trim panel of the luggage compartment: 12-volt socket

Seats and storage
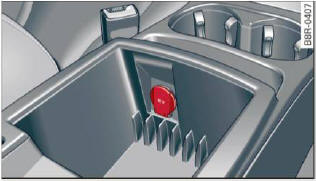
Fig. 92 Center console: 12-volt socket

  • Open the socket cover > fig. 91 or > fig. 92.
  • Insert the plug of the electrical device into the socket.

The 12-volt sockets can be used for electrical accessories.

The power input must not exceed 120 watts.

There is an additional 12-volt socket in the center console.

Before you purchase any accessories, always read and follow the information in Additional accessories and parts replacement.

WARNING

The power outlets and therefore the electrical accessories connected to them operate only with the ignition on. Improper use of the outlets or of electrical accessories can lead to serious injuries or cause a fire. For this reason, children should never be left unattended in the vehicle - they could be injured!

Note

To avoid damaging the socket, only use plugs that fit properly.

Tips

When the engine is off and accessories are still plugged in and are on, the vehicle battery can still be drained.

    READ NEXT:

     Storing

    General overview There are numerous places to store items in your vehicle. Glove compartment Cooling box in glove compartment Storage compartment in the roof Coat hooks Storage in the door panel

     Storage compartment in the roof

    Fig. 95 Storage pocket in the roof To open the lid you have to touch the bar > fig. 95 (Arrow). The lid opens automatically. To close the lid, push it up until it engages. WARNING Always keep

     Warm and cold

    SEE MORE:

     Test Sequence

    Battery, Checking, Vehicles with Battery Monitoring Control Module J367 or Energy Management Control Module J644 and Data Bus On Board Diagnostic Interface J533 In certain model series the following is responsible for monitoring the electrical system: Energy Management Control Module -J644- or

     A-Pillar Trim Panel, Removing and Installing

    Special tools and workshop equipment required Pry Lever -80 - 200- Removing - Remove the instrument panel side cover. Refer to → Chapter "Instrument Panel Side Cover, Removing and Installing". - Remove the gap cover -1- from the A-pillar trim and the sill trim -arrow-. - 

    © 2019-2025 Copyright www.audiq5.net