Audi Q5: Airbag Connector, Replacing
Airbag Connector, Replacing, Bolted Airbag Version
Removing
 WARNING
Follow all Safety Precautions when working with pyrotechnic components. Refer to → Chapter "Pyrotechnic Components Safety Precautions".
- Remove the driver side airbag. Refer to → Chapter "Airbag Unit with Igniter, Removing and Installing, Bolted Airbag Version".
 WARNING
Before handling pyrotechnic components (for example, disconnecting the connector), the person handling it must "discharge static electricity". This can be done by touching the door striker, for example.
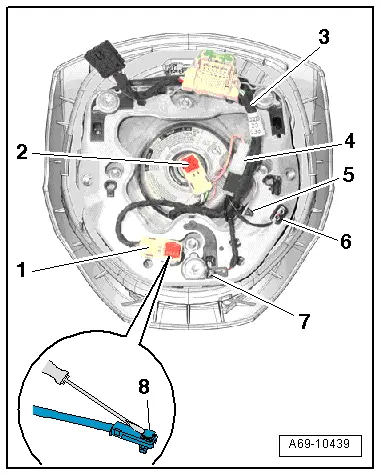
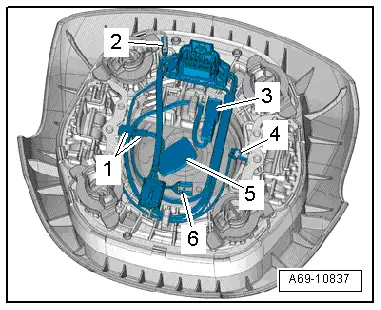
- Disconnect the connectors -4, 6 and 7-.
- Unlock the connector locks -8- using a small screwdriver and then disconnect the connectors -1 and 2- from the Driver Airbag Igniter -N95- and Driver Airbag Igniter 2 -N250-.
- Disengage and remove the wire -3- on the bracket -5-.
Installing
 WARNING
- Follow all Safety Precautions when working with pyrotechnic components. Refer to → Chapter "Pyrotechnic Components Safety Precautions".
- Before handling pyrotechnic components (for example, connecting the connector), the person handling it must "discharge static electricity". This can be done by touching the door striker, for example.
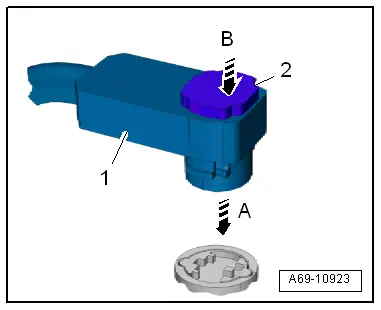
- Connect the connector -1- to the airbag igniter -arrow A-.
- Install the connector locking mechanism -2--arrow B-. While doing this, the connector is pushed into the airbag igniter and locks into place.
The rest of the installation is performed in reverse order of removal, noting the following:
 Note
Note
Make sure the connectors are installed correctly and are secure.
Installation note: For example tightening specifications, replace components. Refer to → Chapter "Driver Side Airbag, Assembly Overview, Bolted Airbag Version".

Airbag Connector, Replacing, Bolted Airbag Version
Removing
 WARNING
Follow all Safety Precautions when working with pyrotechnic components. Refer to → Chapter "Pyrotechnic Components Safety Precautions".
- Remove the driver side airbag. Refer to → Chapter "Airbag Unit with Igniter, Removing and Installing, Attached Airbag Version".
Vehicles with a 3-Spoke Steering Wheel:
 WARNING
Before handling pyrotechnic components (for example, disconnecting the connector), the person handling it must "discharge static electricity". This can be done by touching the door striker, for example.
- Disconnect the connectors -1, 2, 4 and 6- by releasing the tabs.
- Disconnect the connector -3- from the Driver Airbag Igniter 2 -N250- and -5- for the Driver Airbag Igniter -N95-.
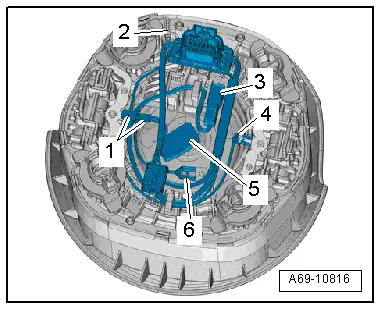
- Open the connector lock -2- with a small screwdriver -arrow- and disconnect the connector -1-.
- Unhook and remove the wiring harness from the bracket.
Versions with 4-Spoke Steering Wheel:
 WARNING
Before handling pyrotechnic components (for example, disconnecting the connector), the person handling it must "discharge static electricity". This can be done by touching the door striker, for example.
- Disconnect the connectors -1, 2, 4 and 6- by releasing the tabs.
- Disconnect the connector -3- from the Driver Airbag Igniter 2 -N250- and -5- for the Driver Airbag Igniter -N95-.
- Open the connector lock -2- with a small screwdriver -arrow- and disconnect the connector -1-.
- Unhook and remove the wiring harness from the bracket.

Installing
 WARNING
- Follow all Safety Precautions when working with pyrotechnic components. Refer to → Chapter "Pyrotechnic Components Safety Precautions".
- Before handling pyrotechnic components (for example, connecting the connector), the person handling it must "discharge static electricity". This can be done by touching the door striker, for example.
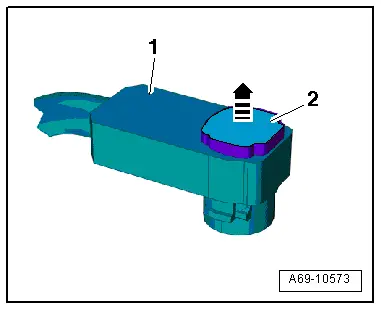
- Connect the connector -1- to the airbag igniter -arrow A-.
- Install the connector locking mechanism -2--arrow B-. While doing this, the connector is pushed into the airbag igniter and locks into place.
The rest of the installation is performed in reverse order of removal, noting the following:
 Note
Note
Make sure the connectors are installed correctly and are secure.