Audi Q5: Head Curtain Airbags
Audi Q5 Type 8R (2008 - 2017) Service Manual / Body / Body Interior / Passenger Protection, Airbags, Seat Belts / Head Curtain Airbags
Overview - Head Curtain Airbag
Head Curtain Airbag, Assembly Overview, Through MY 2010
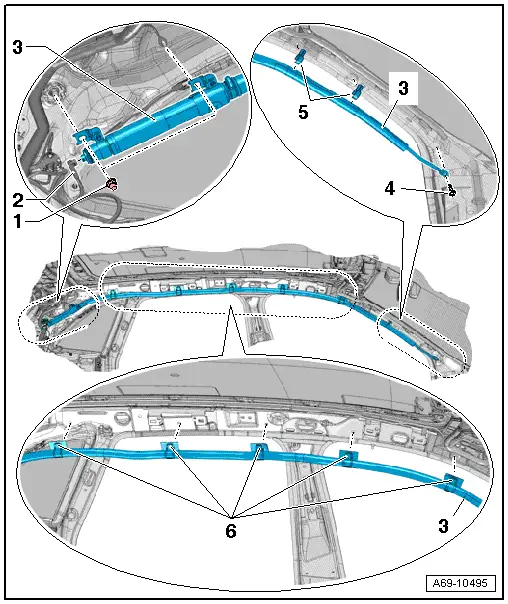
1 - Nut
- 9 Nm
- Quantity: 2
- On the threaded bolts
2 - Connector
- Driver side for Driver Head Curtain Airbag Igniter -N251-
- Front passenger side: for the Front Passenger Head Curtain Airbag Igniter -N252-
- Disconnecting and connecting.
3 - Head Curtain Airbag
- Driver side with Driver Head Curtain Airbag Igniter -N251-
- Passenger side with Front Passenger Head Curtain Airbag Igniter -N252-
 WARNING
Follow all Safety Precautions when working with pyrotechnic components. Refer to → Chapter "Pyrotechnic Components Safety Precautions".
- Removing and installing. Refer to → Chapter "Head Curtain Airbag with Igniter, Removing and Installing".
4 - Bolt
- 3.5 Nm
- Self-locking
- Always replace if removed
- Clean the threaded hole with a thread tap.
5 - Clip
- Quantity: 2
- If it was removed because of an accident, replace the clip
6 - Clip
- Removing and installing.
Head Curtain Airbag, Assembly Overview, from MY 2011
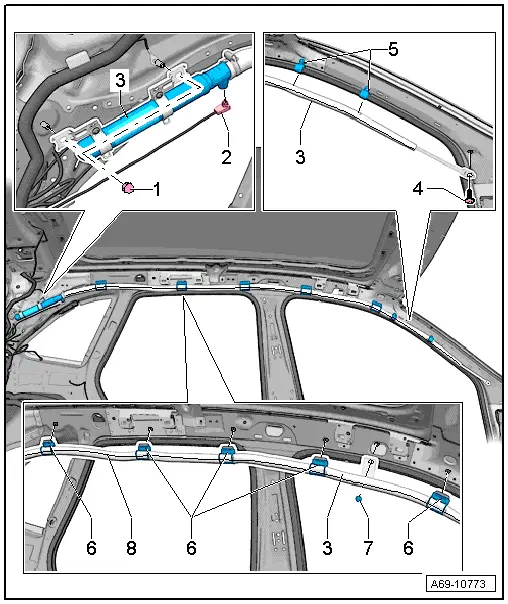
1 - Nut
- 9 Nm
- Quantity: 2
- On the threaded bolts
2 - Connector
- Driver side for Driver Head Curtain Airbag Igniter -N251-
- Front passenger side: for the Front Passenger Head Curtain Airbag Igniter -N252-
- Disconnecting and connecting
3 - Head Curtain Airbag
- Driver side with Driver Head Curtain Airbag Igniter -N251-
- Passenger side with Front Passenger Head Curtain Airbag Igniter -N252-
 WARNING
Follow all Safety Precautions when working with pyrotechnic components. Refer to → Chapter "Pyrotechnic Components Safety Precautions".
- Removing and installing. Refer to → Chapter "Head Curtain Airbag with Igniter, Removing and Installing".
4 - Bolt
- 3.5 Nm
- Self-locking
- Always replace if removed
- Clean the threaded hole with a thread tap.
5 - Clip
- Quantity: 2
- If it was removed because of an accident, replace the clip
6 - Clip
- Removing and installing.
7 - Clip
- Removing and installing.
8 - The Entire Line
- Which serves as the anti-rotation protector,
- Must be visible after installation.

