Audi Q5: Center Console Insert, Removing and Installing
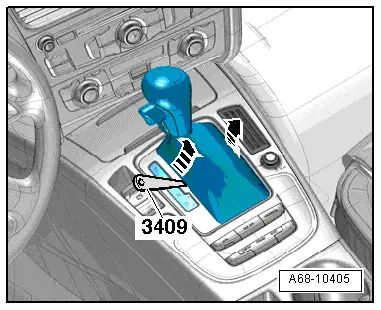
Special tools and workshop equipment required
- Trim Removal Wedge -3409-
Removing
- Vehicles with an S tronic transmission: Move the selector lever into "N".
- Turn off the ignition.
- Remove the Climatronic Control Module -J255-. Refer to → Heating, Ventilation and Air Conditioning; Rep. Gr.87; Display and Control Head; Display and Control Head, Removing and Installing.
- Carefully pry out the selector lever/shift lever boot at the side using a Trim Removal Wedge -3409- or small screwdriver -arrows- and fold it upward.
- Tape off the center console trim panel all around the center console insert using adhesive tape to avoid damaging the surface.
 Caution
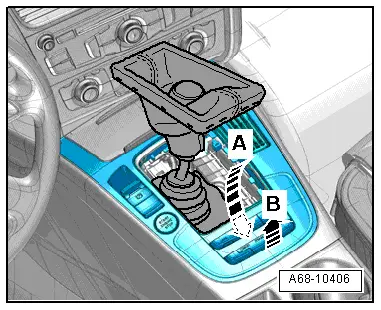
Versions with an access/start authorization button: The retainer on the Access/Start Authorization Button -E408- can be damaged if the center console is lifted too high because the electrical wire to the button is short. Loosen the lift the center console insert carefully.
- Reach with the hand under the center console insert -arrow A- and carefully remove it upward from the center console -arrow B-.
- Disconnect the connectors and carefully remove the center console insert over the selector lever/gearshift lever.
Installing
Install in reverse order of removal. Note the following:
- Press the center console insert in until it engages audibly.
Front Center Console Storage Compartment, Removing and Installing
Removing
- Remove the center console. Refer to → Chapter "Center Console, Removing and Installing".
- Rotate center console.
- Remove the bolts -2 through 5- and remove the storage compartment -1-.
- Versions with a telephone/cellular phone: Remove the telephone/cell phone. Refer to → Communication; Rep. Gr.91; Telephone System; Component Location Overview - Telephone System.
Installing
Install in reverse order of removal.
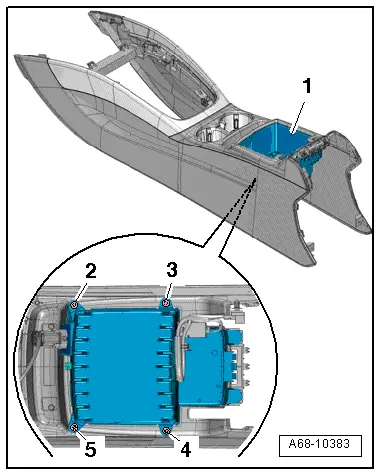
Center Console Masking Panel Compartment, Removing and Installing
Removing
- Remove the center console. Refer to → Chapter "Center Console, Removing and Installing".
- Remove the bolts -2-.
- Rotate center console.
- Remove the screws -3 through 10- and remove the storage compartment -11-.
- Versions with a telephone/cellular phone: Remove the telephone/cell phone. Refer to → Communication; Rep. Gr.91; Telephone System; Component Location Overview - Telephone System.
- Remove the masking panel compartment -1- from the center console.
Installing
Install in reverse order of removal.

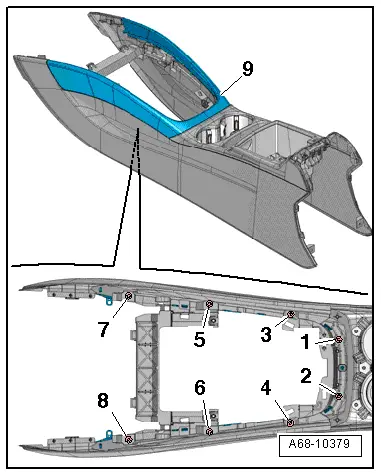
Center Console Decorative Trim, Removing and Installing
Removing
- Remove the center console. Refer to → Chapter "Center Console, Removing and Installing".
- Rotate center console.
- Remove the bolts -1 through 8- and the center console trim panel -9-.
Installing
Install in reverse order of removal. Note the following:
- Tighten the bolts in a -1 through 8- sequence.
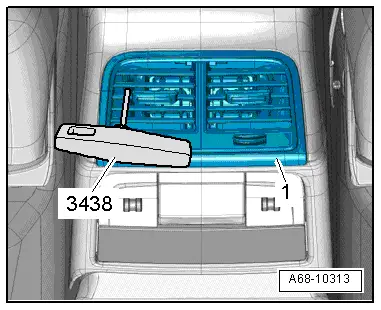
Rear Center Console Air Vent, Removing and Installing
Special tools and workshop equipment required
- T-Handle Hook -3438-
Removing
 Note
Note
The vent has a hole on both sides for attaching the T-Handle Hook -3438-.
- Alternating between the sides, carefully remove the vent -1- from the installation opening using the T-Handle Hook -3438-.
- Versions with lighting: Disconnect the connector.
Installing
- When sliding the vent into the center console, make sure the air duct engages correctly.
- Insert the lower vent, tilt it upward and press it into the installation opening as far as the stop.
Air Vent Grille, Removing and Installing
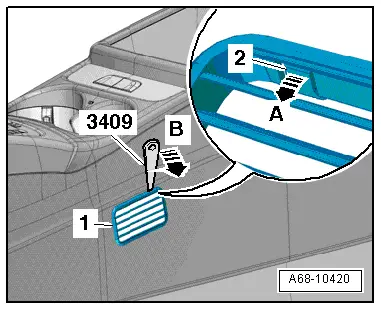
Special tools and workshop equipment required
- Trim Removal Wedge -3409-
Removing
- Starting at the top, carefully unclip the air vent grille -1- from the center console using the Trim Removal Wedge -3409--arrow B-, while releasing the tabs on the corners with a screwdriver -2--arrow A-.
Installing
- Press the air vent grille into the center console until it audibly latches.