Audi Q5: Child Seat Anchors
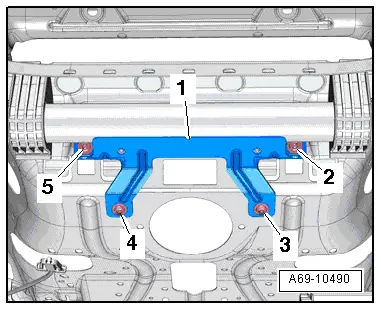
Overview - Front Child Seat Anchors
 Note
Note
The seat pan is shown with the cover.
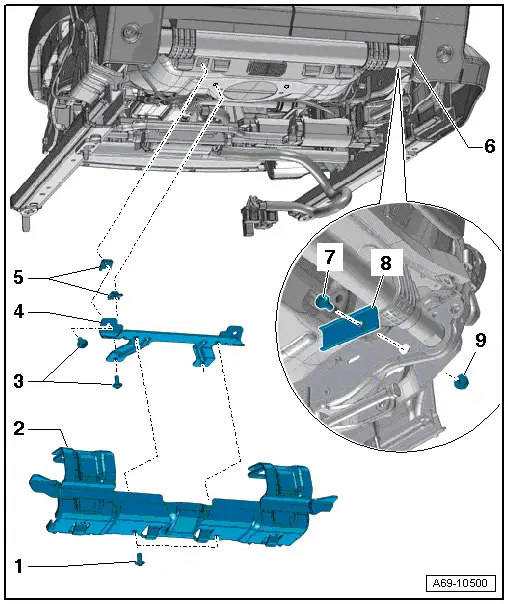
1 - Bolt
- 8 Nm
- Quantity: 2
- Replacing
- Insert the new bolts with Liquid Locking Fluid -D 000 600 A2- (only for service)
2 - LATCH Child Seat Anchorage
- Passenger seat only
- Bolts with a retaining plate
- Check after an accident. Refer to → Chapter "Child Seat Anchors, Checking After a Collision".
- Replace if damaged.
- Removing and installing. Refer to → Chapter "Front Child Seat Anchor, Removing and Installing".
3 - Bolts
- 8 Nm
- Quantity: 4
- Replacing
- Insert the new bolts with Liquid Locking Fluid -D 000 600 A2- (only for service)
4 - Retaining Plate
- Passenger seat only
- Bolted with the seat pan
- Check after an accident. Refer to → Chapter "Child Seat Anchors, Checking After a Collision".
- Replace if damaged.
- Removing and installing. Refer to → Chapter "Front Child Seat Anchor Retaining Plate, Removing and Installing".
5 - Spring nuts
- Quantity: 4
- Inserted in the seat pan
- replace the LATCH anchor if damaged
6 - Lower Seat Frame
7 - Bolt
- 18 Nm
8 - Reinforcement
- Only on power seats
- Located only on the sill side of the seat
- Check after an accident. Refer to → Chapter "Child Seat Anchors, Checking After a Collision".
- Replace if damaged.
- Removing and installing. Refer to → Chapter "Front Child Seat Anchor Reinforcement, Removing and Installing".
9 - Nut
- 18 Nm
Overview - Rear Child Seat Anchors
 Note
Note
- The LATCH child seat anchorages are welded to the seat frame.
- The top tether child seat anchor is welded to the rear seat backrest frame.
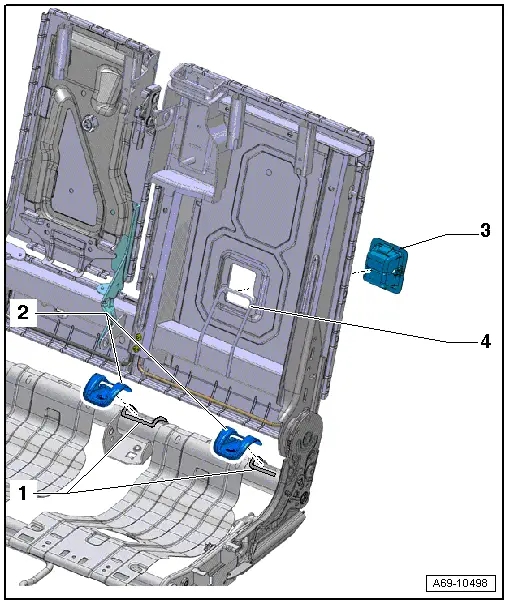
1 - LATCH Child Seat Anchorage
- Welded to the seat frame
2 - Cover
- For the LATCH child seat anchorage
- Removing and installing. Refer to → Chapter "Rear Child Seat Anchor, Removing and Installing, LATCH".
3 - Cover
- For the top tether child seat anchor
- Removing and installing. Refer to → Chapter "Rear Child Seat Anchor, Removing and Installing, Top Tether".
4 - Top Tether Child Seat Anchor
- Welded to the rear seat backrest frame
Front Child Seat Anchor, Removing and Installing
Front Child Seat Anchor, Removing and Installing
Removing
- Bring headrest into lowest lock position.
- Move the passenger seat into a higher position.
- Remove the bolts -2 and 3-.
- Remove the LATCH child seat anchorage -1- toward the rear.
 Note
Note
The seat and LATCH child seat anchor are shown without the cover.
Installing
Install in reverse order of removal. Note the following:
- Replace the bolts coat with Liquid Locking Fluid -D 000 600 A2- and tighten.
Front Child Seat Anchor Retaining Plate, Removing and Installing
Removing
- Remove the front seat. Refer to → Chapter "Front Seat, Removing and Installing".
- Remove the bolts -2, 3, 4 and 5-.
- Remove the LATCH retaining plate -1- from the seat pan.
 Note
Note
The seat and LATCH retaining plate are shown without the cover.
Installing
Install in reverse order of removal. Note the following:
- Check the spring nuts on the seat pan and replace them if damaged.
- Replace the bolts coat with Liquid Locking Fluid -D 000 600 A2- and tighten.
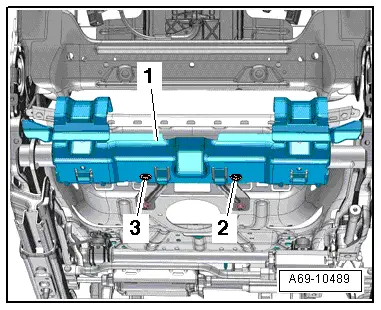
Front Child Seat Anchor Reinforcement, Removing and Installing
Removing
- Bring headrest into lowest lock position.
- Move the passenger seat into a higher position.
- Remove the seat side sill panel trim.
- Front seat manual. Refer to → Chapter "Sill Side Trim, Removing and Installing, Standard/Sport Manual Seats".
- Front seat power. Refer to → Chapter "Sill Side Trim, Removing and Installing, Standard, Comfort Seat, Sport Seat Power Seats".
- Remove the bolt -2- and counterhold the nut -3-.
- Remove the LATCH reinforcement -1-.
 Note
Note
The seat is shown without the cover.
Installing
Install in reverse order of removal. Note the following:
Rear Child Seat Anchor, Removing and Installing
Rear Child Seat Anchor, Removing and Installing, LATCH
Removing
- Remove the cover for the LATCH child seat anchorage -2- from the opening -arrow-.
Installing
- Mount the LATCH child seat anchorage cover -2- correctly on the bracket -1-.
- Remove the LATCH child seat anchorage cover upward and attach it to the bracket.

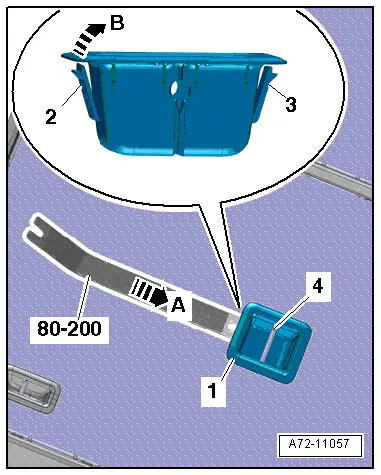
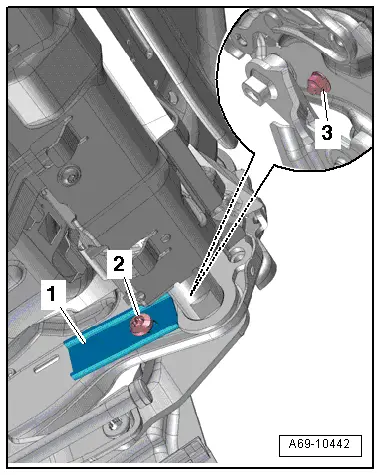
Rear Child Seat Anchor, Removing and Installing, Top Tether
Special tools and workshop equipment required
- Pry Lever -80 - 200-
Removing
- Open the tabs -2 and 3- using the Pry Lever -80 - 200--arrow A- and pry the top tether child seat anchor cover -1- off the rear seat backrest -arrow B-.
- Carefully remove the top tether child seat anchor cover from the bracket -4-.
Installing
- Mount the top tether child seat anchor cover on the bracket and press on it until it audibly latches.