Audi Q5: Installing a roof rack
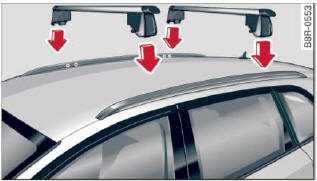
Fig. 82 Roof railing: positioning the roof rack
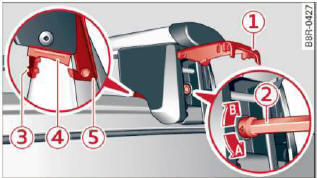
Fig. 83 Roof railing: installing a roof rack
The roof rack set consists of a front and rear roof rack, the cover profile and a socket wrench.
- Open the cap 1 > fig. 83.
- Before mounting the roof rack, use the socket wrench 2 and loosen the left and right screw in the direction of A.
- Clean the attachment points on the roof railing as well as the roof rack rubber washers 4.
- Carefully place the roof rack over the holes in the roof railing > fig. 82.
- Place the pins 3 into the holes. The claw 5 must engage into the edge of the roof railing.
- Make sure the rubber washer 4 lays flat on the roof railing.
- Tighten the left and right screws using the socket wrench 2 in direction B.
- To reach the 4 ft lb (6 Nm) tightening specification needed, both arrows on the socket wrench must align.
- Repeat this procedure on the second roof rack.
WARNING
Check all the roof rack connections each time before each trip and re-tighten or re-adjust if necessary. If you are going to be driving or rough terrain, you will have to check the attachments more often. If you do not do this, the risk of your luggage coming loose and falling off is greater.
Note
The pins and the roof rack claws must engage securely into the holes and into the edge of the roof railing when you tighten the screws!
Tips
You can adjust the width of the roof rack by using a hexagon wrench and turning the screws on the top. Let your authorized Audi dealer help you with this.
Installing the attachments
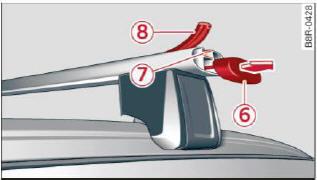
Fig. 84 Roof railing: installing cover profile into the roof
rack
Installing the attachments
- Remove the cap 6 > fig. 84.
- Slide the attachment into the T-groove 7.
- Tighten the attachment according to the roof rack installation instructions.
- Close the cap.
Installing the cover profile
- Seal the openings in the T-groove 7 with the cover profile 8 after having installing the attachments.
- If you not want to use the attachment, seal the whole T-groove 7 with the cover profile 8.
- Cut the cover profile to the length needed, if necessary.

