Audi Q5: Beverage holders
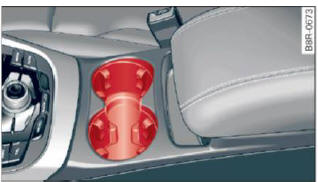
Fig. 85 Center console: Front cupholders
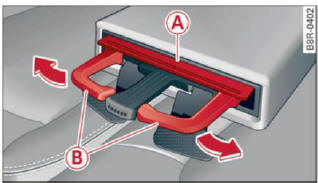
Fig. 86 Beverage storage in the rear armrest
Front cupholders
- You can accommodate two beverages in this storage > fig. 85.
Opening rear beverage holders
- To open the rear cupholder, press on the symbol
.png) A > fig. 86.
A > fig. 86.
Holding beverages at the rear
- To adjust the arm B, swing it in the direction of the arrow.
- Place the beverage in the holder and release the arm. The arm swings back by itself and automatically secures the beverage.
Closing the rear cupholders
- To close the rear cupholder, press on the center section between the two arms and push the cupholder in the slot as far as it will go.
The holding arm must be adjusted such that it lies closely against the cupholder.
A maximum of two beverages can be placed in the center armrest.
WARNING
Spilled hot liquid can cause an accident and personal injury.
- Never carry any beverage containers with hot liquids, such as hot coffee or hot tea, in the vehicle while it is moving. In case of an accident, sudden braking or other vehicle movement, hot liquid could spill, causing scalding burns. Spilled hot liquid can also cause an accident and personal injury.
- Use only soft cups in the cupholder. Hard cups and glasses can cause injury in an accident.
Note
Only drink containers with lids should be carried in the cupholder. Liquid could spill out and damage your vehicle's electronic equipment or stain the upholstery, etc.

