
Audi Q5 Owners & Service Manuals

Audi Q5: Interior lighting

Front/rear interior lights
Lights and Vision
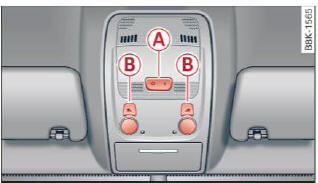
Fig. 51 Front headliner: interior lighting controls
Lights and Vision
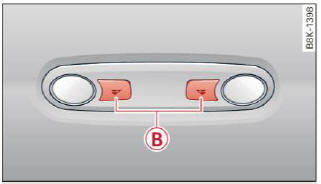
Fig. 52 Rear headliner: rear reading lights

  1. Interior lights

Press the switch > fig. 51 in the corresponding position.

0 - Interior lights off

I - Interior lights on

If the switch is in the center position, the interior lighting is controlled automatically.

  1. Front/rear reading lights

To turn a reading light on/off, press the button > fig. 51 or > fig. 52.

The appearance and location of the rear reading lights may differ depending on the model.

Instrument illumination

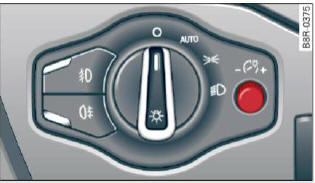
The basic brightness of the illumination for the instruments, the center console and the display can be adjusted.
Lights and Vision
Fig. 53 Instrument illumination

  • Press the knob to release it.
  • Turn the knob toward "-" or"+" to reduce or increase the brightness.
  • Press the knob again to return it to its original position.

Tips

The instrument illumination (for dials and needles) lights on when the ignition is switched on and the vehicle lights are turned off. As the daylight fades, the illumination of the dials likewise dims automatically and will go out completely when the outside light is very low. This feature is meant to remind you to switch on the headlights when outside light conditions become poor.

    READ NEXT:

     Vision

    Sun visors Using the sun visors makes driving safer. Fig. 54 Sun visor The sun visors for the driver and passenger can be pulled out of their brackets in the center of the vehicle and turned towards

     Windshield wipers

    Switching the windshield wipers on Fig. 56 Windshield wiper lever Fig. 57 Rear wiper actuation Move the windshield wiper lever to the corresponding position: 0 - Windshield wiper off 1 - Interval mo

     Cleaning windshield wiper blades

    Clean the windshield wiper blades when they begin to leave streaks. Use a soft cloth and glass cleaner to clean the windshield wiper blades. Front wiper Place the windshield wiper arms in the servic

    SEE MORE:

     Drive Axle, Disassembling and Assembling

    Drive Axle, Disassembling and Assembling, Outer CV Joint with 89 mm or 94 mm Diameter Special tools and workshop equipment required Circlip Pliers (commercially available) Copper or Brass Drift Sealant. Refer to Parts Catalog 89 mm or 94 mm Outer CV Joint, Removing - Clamp the drive axl

     Leaking or Damaged Components except A/C Compressor, Reservoir or Receiver/Dryer

    The refrigerant circuit was completely empty (for example with larger leak or cracked hose)   Note In the event of only a minor leak with slow escape of refrigerant (e.g. at a small leakage point), the amount of refrigerant oil lost and the amount of moisture penetrating is not sufficien

    © 2019-2026 Copyright www.audiq5.net