Audi Q5: Memory function
Memory for driver's seat
Applies to vehicles: with seat memory
The seat adjustment settings for two drivers can be stored using the
memory buttons in the driver's door.
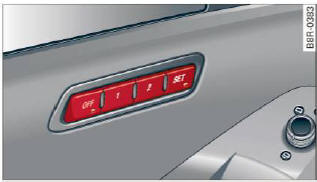
Fig. 65 Driver's door: Seat memory
In addition to the setting for the driver's seat,
the exterior rear view mirror setting can be stored
and recalled through seat memory if the vehicle
is properly equipped.
Storing and recalling settings
With the help of the memory buttons 1 and 2
> fig. 65 the settings for two different drivers
can be stored and recalled.
The current settings are also automatically assigned
to the remote control key being used
when the vehicle is locked. When the vehicle is
unlocked, the settings assigned to the remote
control key being used are automatically recalled.
Turning seat memory on and off
If the [off] switch is depressed, the seat memory
is inoperative. When the Memory function is off,
the LED in the button lights up.
All the stored settings are retained. We recommend
using the [off] switch and deactivating the
seat memory if the vehicle is only going to be
used temporarily by a driver whose settings are
not going to be stored.
READ NEXT:
Applies to vehicles: with seat memory
Storing settings
Adjust the driver's seat.
Adjust the two exterior mirrors.
Press the [SET] button. The light in the button
will come on.
Now press a memory
General information
Safe transportation of passengers on the rear
seats requires proper safety precautions.
All passengers on the rear seats must be seated
in compliance with the safety guidelines exp
Front head restraints
Fig. 68 Front seats head restraints: adjusting the height
The head restraints on the front seats can be adjusted
to provide safe support to head and neck
at the optimum height.
SEE MORE:
Description of front airbags
The airbag system can provide supplemental
protection to properly restrained front seat occupants.
Fig. 165 Location of driver airbag: in steering wheel
Fig. 166 Location of front passenger's airbag: in the instrument
panel
Your vehicle is equipped with an "Advanced Ai
Drive Axle, Disassembling and Assembling, Outer CV Joint with 89 mm or
94 mm Diameter
Special tools and workshop equipment
required
Circlip Pliers (commercially available)
Copper or Brass Drift
Sealant. Refer to Parts Catalog
89 mm or 94 mm Outer CV Joint, Removing
- Clamp the drive axl

