Audi Q5: Overview - Rear Brakes
Audi Q5 Type 8R (2008 - 2017) Service Manual / Chassis / Brake System / Mechanical Components / Overview - Rear Brakes
Applies to all models
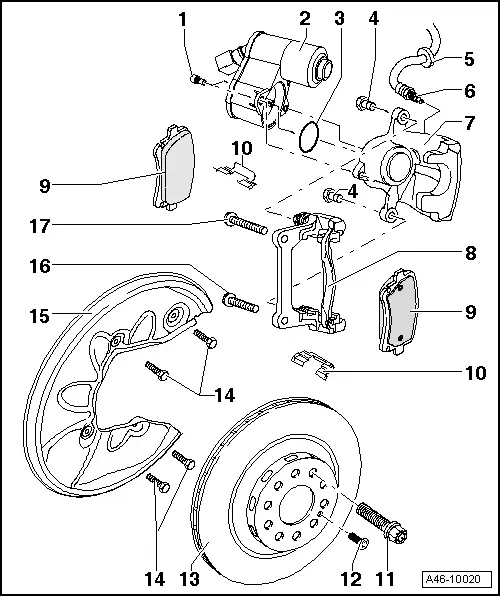
1 - Bolt
- 12 Nm
- Self-locking
- Replace after removing
2 - Parking Brake Motor
- Left Parking Brake Motor -V282-, Right Parking Brake Motor -V283-
3 - Seal
- Replace after removing
4 - Bolt
- 35 Nm
- Self-locking
- When loosening and tightening, counter-hold at guide pin
- Replace after removing
 Note
Note
Upper and lower bolt differ. For allocation. Refer to the Parts Catalog.
5 - Spacer
6 - Brake Hose
- To brake caliper: 20 Nm
 Note
Note
Do not twist it when installing
- Do not disconnect brake line when changing brake pads
- Make sure that retaining tabs are seated correctly in bracket.
7 - Brake Caliper
- Do not remove the brake hose when changing the brake pads.
- Brake Caliper, Servicing
- It is possible to install brake carrier with brake caliper
8 - Brake Carrier with Guide Pins and Cap
- Supplied as an assembled replacement part with sufficient grease on guide pins
- Install the repair kit if the caps or guide pins are damaged. Use supplied grease packet to lubricate guide pins
- it is possible to install brake carrier with brake caliper
9 - Brake Pads
- Check the brake pad thickness.
- Wear limit.
- Always replace on both axles.
- it is possible to install brake carrier with brake caliper
 Note
Note
The brake pads must be seated between both securing tabs on the brake pad retaining plate to provide the air gap between the brake rotor and brake pad.
10 - Brake Pad Retaining Plate
- Always replace when pads are replaced
 Note
Note
The brake pads must be seated between both securing tabs on the brake pad retaining plate to provide the air gap between the brake rotor and brake pad.
11 - Wheel Bolts
- Tightening specification: Refer to →Wheel and Tire Guide; Rep. Gr.44
12 - Bolt
- 5 Nm
13 - Brake Rotor
- Allocation. Refer to the Parts Catalog.
- Wear limit. Refer to → Chapter "Technical Data for Brakes".
- Always replace on both axles.
14 - Bolts
- 10 Nm
15 - Brake shield
16 - Bolt
- 100 Nm + 90º
- Replace
17 - Bolts
- 100 Nm + 90º
- Replace

