Audi Q5: Boot, Replacing
Boot, Replacing, Driveshaft Connected on Transmission Side
Special tools and workshop equipment required
- Flanging Tool -T40261-
- Hose Clamp -23 to 35 mm Diameter-
Procedure
- Remove the driveshaft. Refer to → Chapter "Driveshaft, Removing and Installing, Driveshaft Connected on Transmission Side".
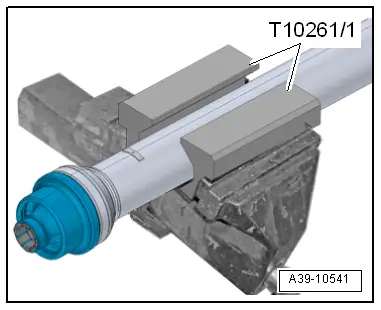
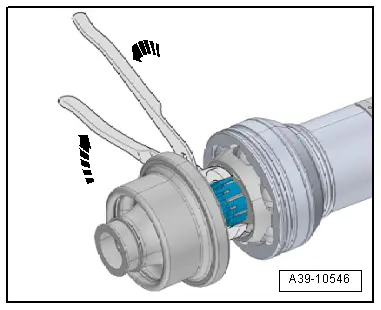
- Clamp the driveshaft with the Flanging Tool - Protective Jaws -T40261/1- into the vise, as shown in the illustration.
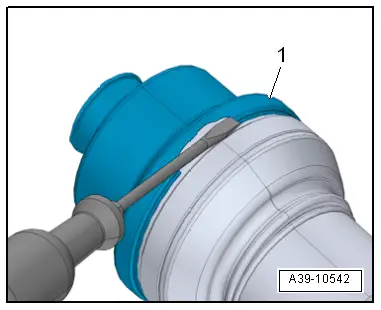
- Carefully loosen the metal sleeve flanging -1- from the driveshaft joint at one place with a screwdriver.
- The surface on the driveshaft joint must not be damaged.
- Open the rest of the metal sleeve flanging -arrow- with a side cutter.
- Remove the old boot with the metal sleeve from the driveshaft joint.
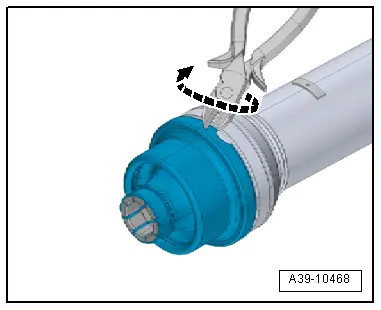
- Break the support ring with the water pump pliers -arrows- and remove the boot with the metal sleeve.
 Note
Note
The inside of the joint and the balls remain in the driveshaft joint.
- Wipe away any excess grease.
- Grease the driveshaft joint with grease from the installation kit.
 Note
Note
Fill with the same amount of grease, that has been clean off plus the amount that remains in the old boot.
- Clean the sealing surface -arrow- on the driveshaft joint -2-.
- If there are scratches left behind after removing the old boot, smooth them out.
- Insert a new O-ring -1- in the groove.

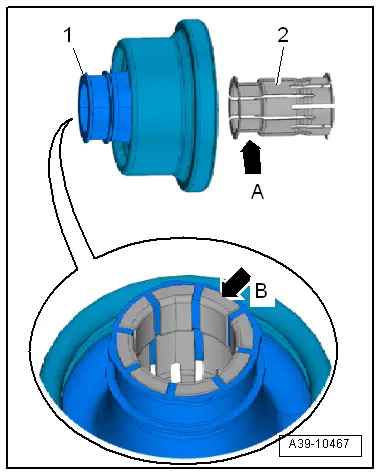
- Install the support ring -2- in the boot opening -1-.
- Direction of installation: the depression -arrow A- is slid into the boot.
- The guides for the support ring -arrow B- must be visible on the edge of the boot opening.
- Fold the boot -2- inward inside the metal sleeve -1-.
- Slide the hose clamp -arrow- onto the open guides for the support ring -3- as shown in the illustration.
- The end of the support ring must be freed up.
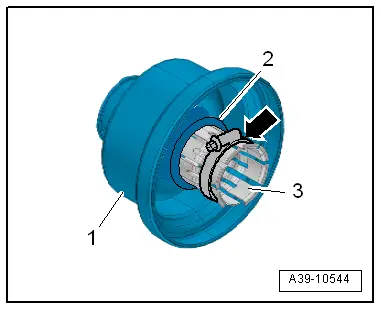
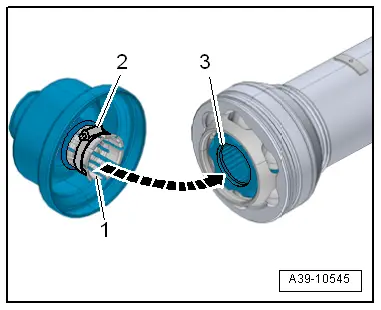
- Tighten the hose clamp -2- until the support ring guides -1- are able to be inserted into the groove -3- of the inside of the joint.
- Loosen the hose clamp -2- and remove.
- The support ring guides must catch on the inside of the groove -arrow-.
- Slide the metal sleeve for the boot all the way onto the joint.
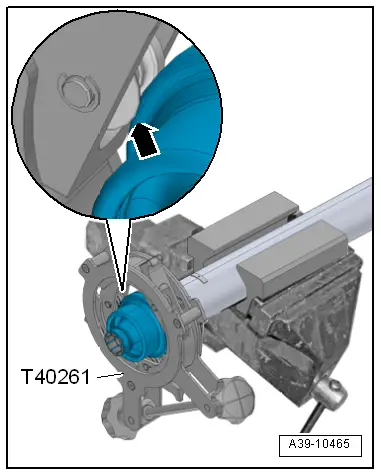
- Attach the Flanging Tool -T40261- to the metal sleeve so that the guide roller stops -arrow- are touching the edge of the metal sleeve.
- Flange the metal sleeve by turning the Flanging Tool -T40261- back and forth.
- The turning angle must be at least 90º when turning it back and forth.
- While turning it back and forth, turn the hand wheel for the Flanging Tool -T40261-.
- The flanging is finished when the hand wheel for the Flanging Tool -T40261- can only be turned if a lot of force is used.