Audi Q5: Component Location Overview - Luggage Compartment Trim Panels
Audi Q5 Type 8R (2008 - 2017) Service Manual / Body / Body Interior / Interior Trim / Component Location Overview - Luggage Compartment Trim Panels
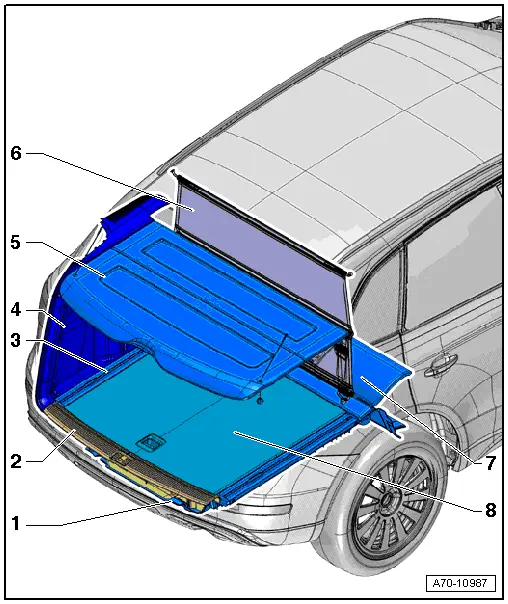
1 - Spare Wheel Well Trim
- Overview. Refer to → Chapter "Luggage Compartment Trim Panel and Battery Recess Cover, Assembly Overview".
- Removing and installing. Refer to → Chapter "Spare Wheel Well Trim, Removing and Installing".
2 - Rear Lid End Trim Panel
- Overview. Refer to → Chapter "Overview - Lock Carrier Trim".
- Removing and installing. Refer to → Chapter "Lock Carrier Trim, Removing and Installing, Non-Hybrid Vehicles".
3 - Gap Cover or Retaining Track
- Overview. Refer to → Chapter "Overview - Luggage Compartment Floor".
- Gap cover, removing and installing. Refer to → Chapter "Gap Cover, Removing and Installing, Vehicles without a Retaining Track"
- Retaining tracks, removing and installing. Refer to → Chapter "Rail, Removing and Installing"
4 - Luggage Compartment Side Trim
- Overview. Refer to → Chapter "Overview - Luggage Compartment Side Trim Panel".
- Removing and installing. Refer to → Chapter "Luggage Compartment Side Trim Panel, Removing and Installing".
5 - Luggage Compartment Cover
- Different versions, allocation Parts Catalog
- Overview. Refer to → Chapter "Luggage Compartment Cover, Assembly Overview".
6 - Screen Separator Wall
- Overview. Refer to → Chapter "Overview - Screen Separator".
7 - Front Luggage Compartment Floor
- Overview. Refer to → Chapter "Overview - Luggage Compartment Floor".
- Removing and installing. Refer to → Chapter "Luggage Compartment Floor Panel, Removing and Installing".
8 - Rear Luggage Compartment Floor
Luggage Compartment Cover, Assembly Overview
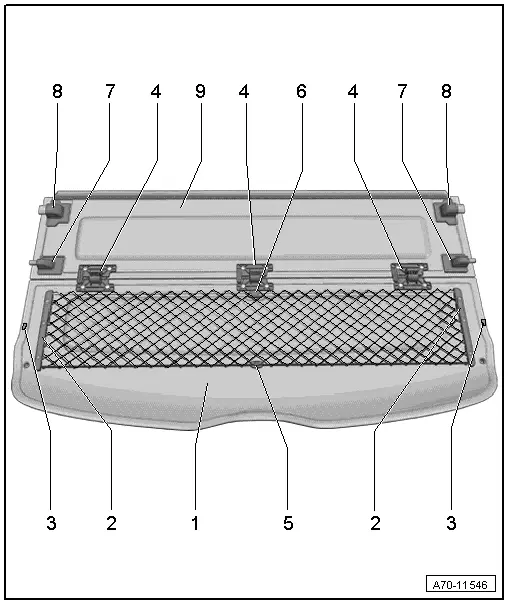
1 - Rear Luggage Compartment Cover
There are two different versions for the luggage compartment cover.
Version 1:
- The underside is smooth and all attachments are installed. The large bolt is for installing the hinges and the small bolt for the storage net attachments.
- To repair, there is a repair kit that contains all of the attachments (hinges, mount, attachments for the storage net and the bolts). Refer to Parts Catalog.
- Just repair the damaged attachment on uninstalled luggage compartment covers.
- The mounts and hinges come with positioning aids
Version 2:
- The underside is made of material and, except for the D-pillar protection, all of the attachments are riveted in place.
- Only the D-pillar can be replaced.
- Riveted components cannot be replaced.
2 - Rail for Storage Net 2x
- 1.6 Nm
- Depending on the version: either bolted or riveted in place
- Small bolt
- The rails for versions 1 and 2 are different
3 - D-Pillar Protector 2x
- 1.6 Nm
- Bolted in place
- Bolt
4 - Hinge 3x
- 1.6 Nm
- Depending on the version: either bolted or riveted in place
- Large bolt
- the two outside hinges are the same, but the center one is different
5 - Mount for the Storage Net
- 1.6 Nm
- Depending on the version: either bolted or riveted in place
- Small bolt
6 - Mounts for the Storage Net
- 1.6 Nm
- Depending on the version: either bolted or riveted in place
- Small bolt
7 - Small Mount 2x
- 1.6 Nm
- Depending on the version: either bolted or riveted in place
- Large bolt
8 - Large Mount 2x
- 1.6 Nm
- Depending on the version: either bolted or riveted in place
- Large bolt
9 - Front Luggage Compartment Cover
There are two different versions for the luggage compartment cover.
Version 1:
- The underside is smooth and all attachments are installed. The large bolt is for installing the hinges and the small bolt for the storage net attachments.
- To repair, there is a repair kit that contains all of the attachments (hinges, mount, attachments for the storage net and the bolts). Refer to Parts Catalog.
- Just repair the damaged attachment on uninstalled luggage compartment covers.
- The mounts and hinges come with positioning aids
Version 2:
- The underside is made of material and, except for the D-pillar protection, all of the attachments are riveted in place.
- Only the D-pillar can be replaced.
- Riveted components cannot be replaced.

