Audi Q5: Door Handle, Removing and Installing
Removing
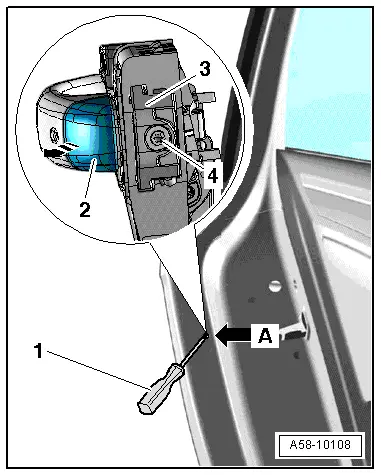
- Press the door outer seal to the side and remove the protective film over the hole -arrow A-.
- Remove the locking bolt -4- as far as the stop using a screwdriver -1-.
- Pull the exterior door handle and hold it in the "opened" position.
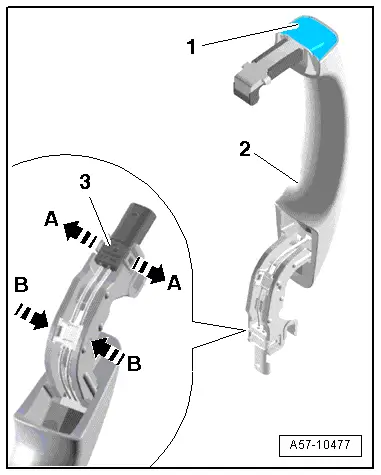
- Press the housing retaining bracket -3- inward, the exterior door handle is secured in the "opened" position.
- Remove the housing -2- from the mounting bracket -arrow B-.
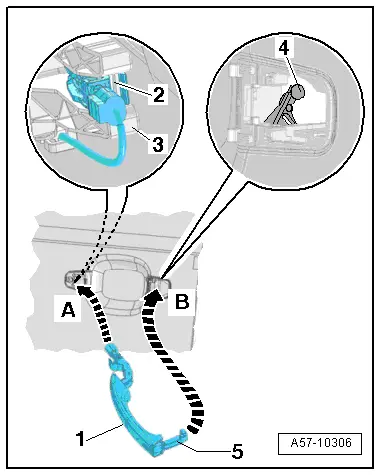
- Pull the exterior door handle -1- in the direction of the -arrow-. This disengages the handle from the operating lever in the mounting bracket.
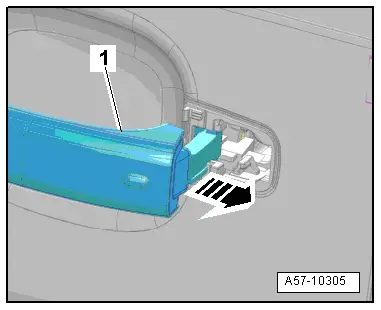
- Tilt the exterior door handle -1- outward -arrow- and remove it from the mount on the mounting bracket.
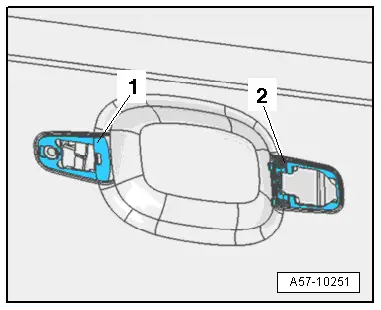
- In vehicles with the "keyless entry system", disconnect the connector -2- from the exterior door handle.
Installing
- Replace the exterior door handle washers -1- and -2- if damaged or brittle.
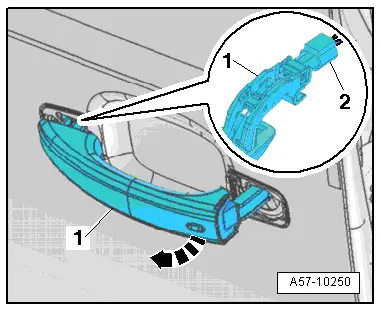
- Insert the exterior door handle -1--arrow A-. It must engage in the mount -2- on the mounting bracket -3-.
- Tilt the exterior door handle -1- in the direction of -arrow B- and slide the "coupling plate"-5- into the mounting bracket in front of the operating lever -4-.
- Press the housing retaining bracket onto the exterior door handle.
- Install the housing. Refer to → Chapter "Housing, Removing and Installing".
Door Handle Trim, Removing and Installing
In vehicles without "keyless entry", trim installed instead of the outer door handle touch sensor.
Removing
- Remove the outside door handle.
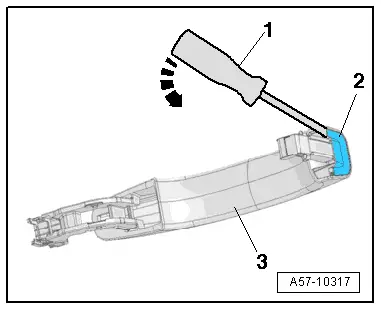
- Pry the exterior door handle trim -2- out using an awl -1- at the location shown in the illustration -arrow-.
- Remove the trim from the exterior door handle -3-.
Installing
- Slide the exterior door handle trim in until it engages audibly.
- Install the outer door handle.
- Install the housing. Refer to → Chapter "Housing, Removing and Installing".
Door Handle Trim Molding, Removing and Installing
Door Handle Trim Molding, Removing and Installing
Removing
- Remove the door handle. Refer to → Chapter "Door Handle, Removing and Installing".
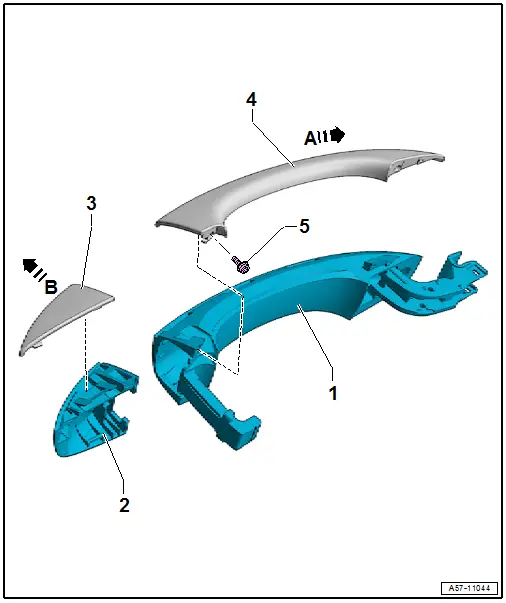
- Remove the bolt -5-.
- Remove the trim molding -4- from the door handle -1--arrow A-.
Installing
Install in reverse order of removal and note the following:
- Tighten the screw -5- 0.2 Nm.
- The bolt head must not project over the contact surface for the tread.
Cap Trim Molding, Removing and Installing
Removing
- Remove the cap. Refer to → Chapter "Housing Cap, Removing and Installing".
- Remove the trim molding -3- from the cap -2--arrow B-.
Installing
Install in reverse order of removal.
Rear Outside Door Handle Touch Sensor - G417-/- G418-, Removing and Installing
 Caution
To prevent damaging the sensor, follow the instructions as described.
- Remove the exterior door handle -2- and sensor -1-. Refer to → Chapter "Door Handle, Removing and Installing".
- Using a small screwdriver, carefully release the latches at the arrows - A and B- and push the connector -3- and the wiring guide to the side.
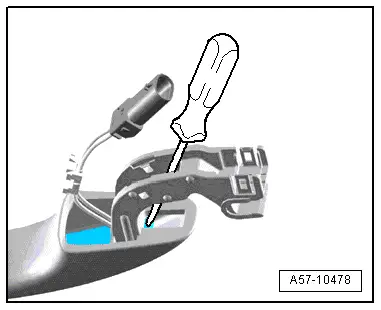
- Insert a screwdriver in front of the sensor as illustrated.
- With light force on the screwdriver, pry out the sensor from the exterior door handle.
- Remove the sensor from the exterior door handle.