Audi Q5: Foot Rest, Removing and Installing
Special tools and workshop equipment required
- Trim Removal Wedge -3409-
Removing
 Note
Note
The footrest is destroyed during removal and must be replaced.
- Remove the instrument panel cover on the driver side. Refer to → Chapter "Driver Side Instrument Panel Cover, Removing and Installing".
- Remove the front driver side sill panel trim. Refer to → Chapter "Sill Panel Strip, Removing and Installing, Front Sill Panel".
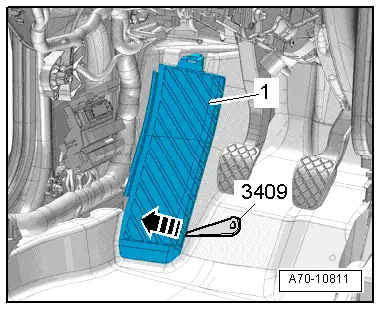
- Unclip foot rest -1- using the Trim Removal Wedge -3409--arrow- and remove.
Installing
Install in reverse order of removal. Note the following:
- Replace the footrest and make sure it engages completely in the mounts.
Carpet, Removing and Installing
Removing
- Remove front seats. Refer to → Chapter "Front Seat, Removing and Installing".
- Remove the rear seats. Refer to → Chapter "Rear Seat, Removing and Installing".
- Remove the instrument panel cover on the driver side. Refer to → Chapter "Driver Side Instrument Panel Cover, Removing and Installing".
- Remove the center console. Refer to → Chapter "Center Console, Removing and Installing".
- Remove the center console bracket and lower the shift mechanism. Refer to → Chapter "Center Console Bracket, Removing and Installing".
- Remove the rear center console vent on the center tunnel. Refer to → Heating, Ventilation and Air Conditioning; Rep. Gr.87; Air Guide; Overview - Air Routing and Air Distribution in Passenger Compartment.
- Remove the front sill panel trim. Refer to → Chapter "Sill Panel Strip, Removing and Installing, Front Sill Panel".
- Remove the lower B-pillar trim panel. Refer to → Chapter "B-Pillar Trim Panel, Removing and Installing, Lower B-Pillar Trim Panel".
- Remove the rear sill panel trim. Refer to → Chapter "Sill Panel, Removing and Installing, Rear Sill Panel".
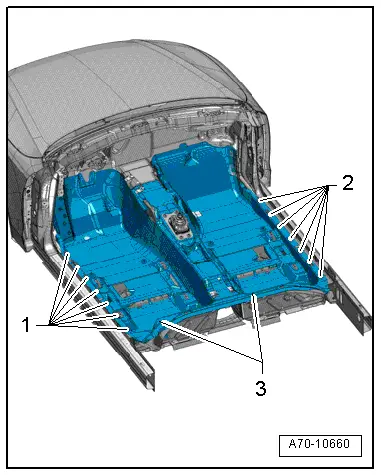
- Disengage the floor covering at brackets -1- and -2-.
- Pull the floor covering -3- back.
 Note
Note
Make sure the floor covering does not tear at the openings.
- Fold the floor covering lengthwise and remove it through a door.
Installing
- Fold the floor covering lengthwise and lay it in the vehicle.
- First slide the floor covering forward until the air duct and shift mechanism openings are aligned.
- Then attach the floor covering at brackets -1- and -2-.
Install in reverse order of removal.