Audi Q5: Hydraulic Fluid Cooler, Removing and Installing
Special tools and workshop equipment required
- Hose Clamps - Up To 25 mm -3094-
- Hose Clip Pliers -VAG1275A-
- Shop Crane - Drip Tray -VAS6208-
Removing
- Remove the lock carrier cover at the front. Refer to → Body Exterior; Rep. Gr.50; Lock Carrier.
- Clamp off the hydraulic lines -5- and -6- using the Hose Clamps Up To 25 mm Diameter -3094-.
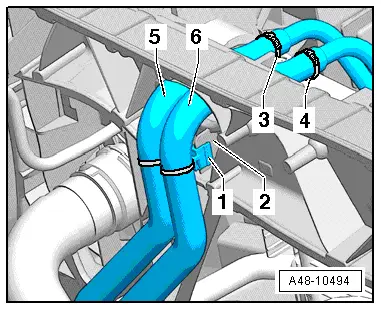
- Remove the clamping sleeves -3- and -4-.
- Disconnect the hydraulic lines -5- and -6- from the hydraulic oil cooler.

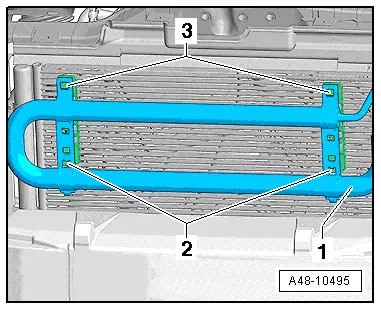
- Release the retaining tabs -3-, tilt the hydraulic oil cooler -1- forward slightly and remove it from the mounts -2- on the A/C condenser.
Installing
Install in reverse order of removal. Note the following:
- The connections must free of oil and grease, clean if necessary.
- The markings -2- on the hose line must point upward in the "12 o'clock" position.
 Caution
When attaching the hose lines -1-, counterhold on the pipe lines -4-.
- Fill the Hydraulic Fluid.
- Clean any oiled places.
- Bleed the steering. Refer to → Chapter "Steering, Bleeding After Replacing".
- Check hydraulic fluid level. Refer to → Chapter "Power Steering Fluid Level, Checking".
- Check all open line connections for leaks. Refer to → Chapter "Steering, Checking for Leaks".
- Install the lock carrier cover at the front. Refer to → Body Exterior; Rep. Gr.50; Lock Carrier.

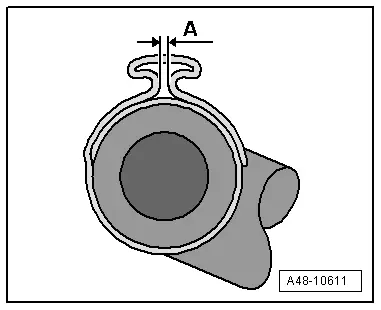
Clamping Sleeve Installation Position
- Close the clamp completely using the Hose Clip Pliers -VAG1275A-.
Do not exceed dimension -A- by 1 mm. If necessary, tighten the clamp with Hose Clip Pliers -VAG1275A-.
 Note
Note
Secure all hose connections with hose clamps appropriate to the model. Refer to the Parts Catalog.

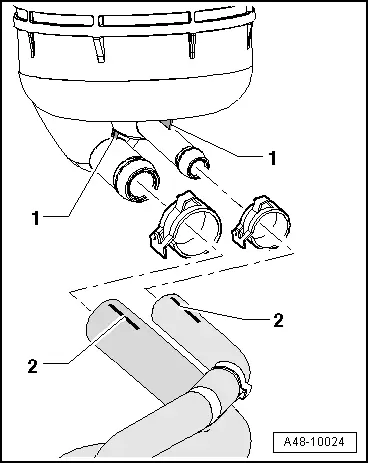
Hose Line to Reservoir, Hydraulic Fluid Cooler and Return Line Installation Position
Installation position of the lines on the reservoir, applies to all engines
- The connections must free of oil and grease, clean if necessary
- The markings -2- on the lines must align with the bars -1- on the reservoir.
- Positioning of the clamp lock in front driving direction
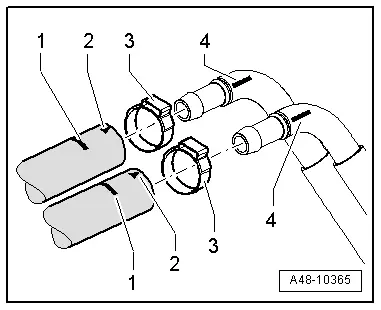
Hose line to hydraulic oil cooler installation position
- The connections must free of oil and grease, clean if necessary
- The markings -2- on the hose line must point upward in the "12 o'clock" position.
 Caution
When attaching the hose lines -1-, counterhold on the pipe lines -4-.
- Secure the clamps -3- on the markings -1-.
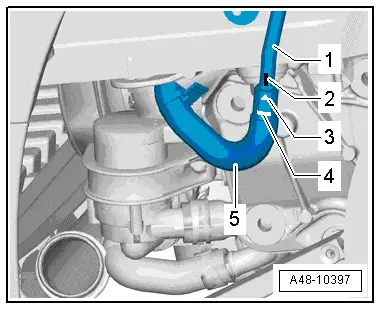
Installation position on the return line connection
- The connections must free of oil and grease, clean if necessary.
- The marking -3- on the line -5- must align with the marking -2- on the pipe -1-.
- Secure the clamp (not pictured) on the marking -4-.
Clamping Sleeve Installation Position
- Close the clamp completely using the Hose Clip Pliers -VAG1275A-.
Do not exceed dimension -A- by 1 mm. If necessary, tighten the clamp with Hose Clip Pliers -VAG1275A-.