Audi Q5: Outer Seal, Replacing and Installing
 Note
Note
Replace the seal after replacing the sunroof.
Special tools and workshop equipment required
- Roller -3356-
Seal, Removing
- Sunroof frame removed.
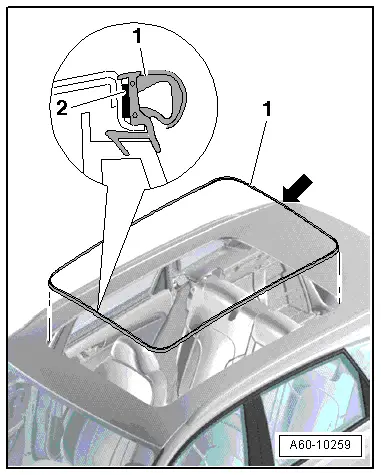
- For removal, remove the seal -1- from around the roof opening.
Seal, Installing
- Before installing seal, remove adhesive residue if necessary.
- Make sure there is no dust or grease on the adhesive surface.
- Clean the adhesive surface thoroughly with Cleaning Solution -D 009 401 04-.
- Wipe down the surfaces on the frame with the supplied primer towel.
- Align the seal-joint -1- in the center of the rear roof opening -arrow-.
- Peel off the protective film from the adhesive strip -2- on the side of the joint.
- Position seal on flange and at the same time, press it on past radius.
- Peel off the protective film from the adhesive tape in sections and press the seal on.
- Press seal on evenly to prevent any excess length.
- Press seal on firmly and evenly with a roller, running it all around 2 times.
Inner Seal, Replacing
Special tools and workshop equipment required
- Roller -3356-
- Adhesive Strip Remover -VAS6349-
- Remove the front glass panel. Refer to → Chapter "Sunroof Panel, Removing and Installing".
- Remove the rear glass panel. Refer to → Chapter "Rear Sunroof Panel, Removing and Installing".
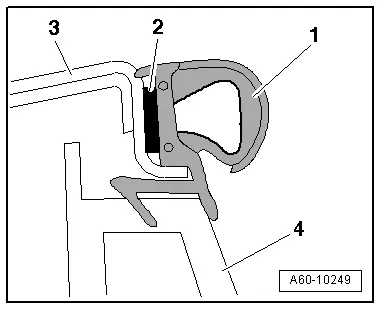
- Remove the inner seal -2- from the frame -1-.
- Remove any adhesive residue with Adhesive Strip Remover -VAS6349-.
- Make sure there is no dust or grease on the adhesive surface.
- Clean the adhesive surface thoroughly with Cleaning Solution -D 009 401 04-.
- Wipe down the surfaces on the frame with the supplied primer towel.
- Position the inner seal -2- onto the frame surfaces-1- with the joint in the center of the rear roof opening.
- Peel off the protective film from the adhesive strip -3- on the new inner seal in sections and press the seal on.
- Press the inner seal on evenly to prevent any excess length.
- Press the inner seal evenly all around two times with the Roller -3356-.
- Install the rear glass panel. Refer to → Chapter "Rear Sunroof Panel, Removing and Installing".
- Install the front glass panel. Refer to → Chapter "Sunroof Panel, Removing and Installing".

Power Sunroof Control Module -J245-, Removing and Installing
Removing
- Remove the Sunroof Adjustment Regulator - E139-. Refer to → Electrical Equipment; Rep. Gr.96; Controls; Overview - Roof Trim Panel Controls.
- Disconnect all connectors for the Power Sunroof Control Module - J245-.
- Remove the screws on the sunroof motor and remove the Power Sunroof Control Module - J245- from the headliner.
Installing
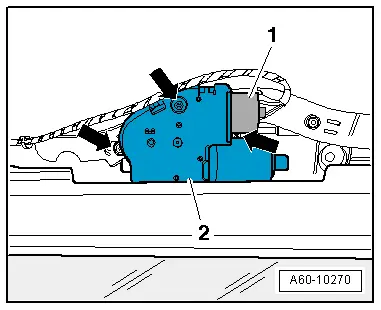
- Install the Power Sunroof Control Module - J245--2- and tighten the screws -arrows- to 3.5 Nm.
- Connect the connector -1- on the sunroof motor -2-.
- Install the headliner. Refer to → Body Interior; Rep. Gr.70; Roof Trim Panels; Headliner, Removing and Installing.
- After completing the work procedure, perform an adaptation on the sunroof motor. Refer to → Chapter "Power Sunroof Control Module -J245-, Programming".
Roof Shade Control Module - J394-, Removing and Installing
Removing
- Remove the headliner. Refer to → Body Interior; Rep. Gr.70; Roof Trim Panels; Headliner, Removing and Installing.
- Disconnect the connector -1- on the Roof Shade Control Module - J394--2-.
- Remove the bolts -arrows- from the Roof Shade Control Module - J394--2-.
- Remove the Roof Shade Control Module - J394--2-.
Installing
- Install in reverse order of removal.

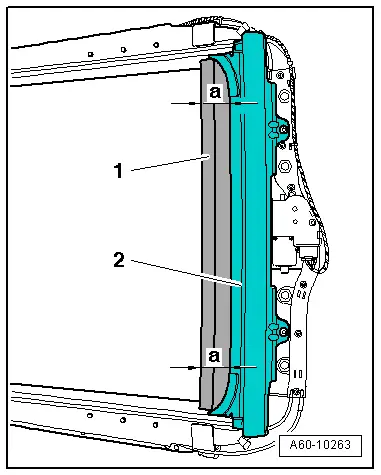
- Prior to installing the motor, make sure the sun shade is parallel by measuring -dimension a- between the shade arch -1- and the shade cartridge -2-.
Tightening specification
- Bolts 3.5 Nm
- After completing the work procedure, perform an adaptation on the sun shade motor. Refer to → Chapter "Roof Shade Control Module - J394-, Programming".
Power Sunroof Control Module -J245-, Programming
 Note
Note
- Whenever a glass panel, a motor, the slotted guide rail or the sun shade is removed, it is necessary to perform an adaptation for the appropriate drive.
- If new replacement motors have been installed, then the adaptation process will start immediately after the switch is activated, with no 10 second waiting period.
- Pinch protection is switched off when performing an adaptation.
The ignition is switched on.
The Sunroof Adjustment Regulator -E139- must be in the "sunroof closed" position.
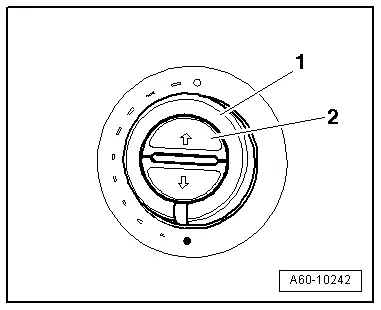
- Pull the Sunroof Adjustment Regulator -E139--1- down -arrow- and hold it in this position for the entire adaptation process (approximately 20 seconds).
- During the adaptation, the glass sunroof will first close and then retract approximately 200 mm.
- Once the panel closes again, the adaptation has ended. Release the Sunroof Adjustment Regulator -E139- after the sunroof closes again and the adaptation procedure has ended.

Roof Shade Control Module - J394-, Programming
 Note
Note
- Whenever a glass panel, a motor, the slotted guide rail or the sunroof shade is removed, it is necessary to perform an adaptation for the appropriate drive.
- If new replacement motors have been installed, then the adaptation process will start immediately after the switch is activated, with no 10 second waiting period.
- Pinch protection is switched off when performing an adaptation.
The ignition is switched on.
- Press the Roof Shade Button 2 -E585-"close sun shade "-2- and hold it in this position for the entire adaptation process (approximately 20 seconds).
- During the adaptation, the glass sliding sunroof will first close and then retract approximately 200 mm.
- Once the sun shade has closed again completely, the adaptation procedure has ended. Release the Roof Shade Button 2 -E585-.