Audi Q5: Overview - Seat Versions
Component Location Overview - Seat Versions
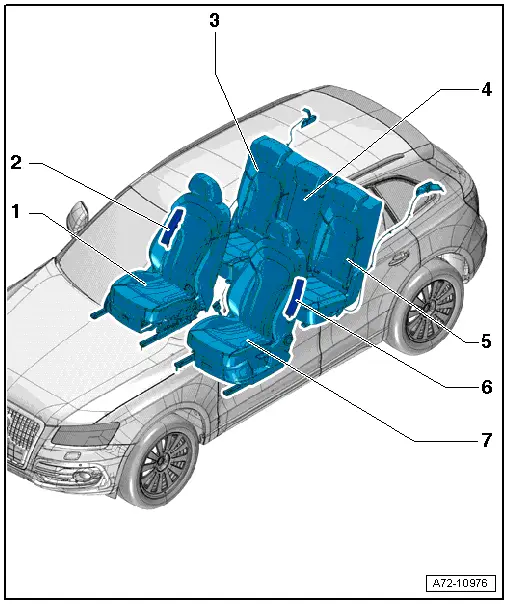
1 - Front Passenger Seat
Standard Seat (Manual)
- Overview. Refer to → Chapter "Front Standard Manual Seat, Assembly Overview".
Vehicles with:
- Seat and backrest heating
- Four-Way Lumbar Support
- Drawer/storage compartment
- LATCH child seat anchorage
Power Standard Seat
- Overview. Refer to → Chapter "Front Standard Power Seat, Assembly Overview".
Vehicles with:
- Memory function
- Seat and backrest heating
- Storage compartment
- LATCH child seat anchorage
Folding Seat (Manual)
- Overview. Refer to → Chapter "Overview - Front Folding Passenger Seat".
Vehicles with:
- Seat and backrest heating
- Drawer
- LATCH child seat anchorage
Comfort Seats (Power)
- Overview. Refer to → Chapter "Front Seat, Assembly Overview, Comfort Seat".
Vehicles with:
- Memory function
- Storage compartment
- LATCH child seat anchorage
Sport Seat (Manual)
- Overview. Refer to → Chapter "Front Sport Manual Seat, Assembly Overview".
Vehicles with:
- Seat and backrest heating
- Storage compartment
- LATCH child seat anchorage
Power Sport Seat
- Overview. Refer to → Chapter "Front Sport Power Seat, Assembly Overview".
Vehicles with:
- Memory function
- Seat and backrest heating
- Storage compartment
- LATCH child seat anchorage
2 - Side Airbag, Front Passenger Side
- with Front Passenger Thorax Airbag Igniter -N200-
- Overview. Refer to → Chapter "Overview - Front Side Airbag".
3 - Rear Seat, One Third, Right
- Overview. Refer to → Chapter "Overview - Seat Bench/Single Seat".
Vehicles with:
- Seat forward/back adjuster
- Seat and backrest heating
- LATCH child seat anchorage
4 - Center Armrest/Pass-Through Door
- In the left 2/3 rear seat backrest
- Overview. Refer to → Chapter "Overview - Center Armrest".
5 - Left 2/3 Rear Seat
- Overview. Refer to → Chapter "Overview - Seat Bench/Single Seat".
Vehicles with:
- Center Armrest
- Center armrest and pass-through door
- Seat forward/back adjuster
- Seat and backrest heating
- LATCH child seat anchorage
6 - Side Airbag, Driver Side
- with Driver Thorax Airbag Igniter -N199-
- Overview. Refer to → Chapter "Overview - Front Side Airbag".
7 - Driver Seat
Standard Seat (Manual)
- Overview. Refer to → Chapter "Front Standard Manual Seat, Assembly Overview".
Vehicles with:
- Seat and backrest heating
- Four-Way Lumbar Support
- Drawer/storage compartment
Power Standard Seat
- Overview. Refer to → Chapter "Front Standard Power Seat, Assembly Overview".
Vehicles with:
- Memory function
- Seat and backrest heating
- Storage compartment
Comfort Seats (Power)
- Overview. Refer to → Chapter "Front Seat, Assembly Overview, Comfort Seat".
Vehicles with:
- Memory function
- Storage compartment
Sport Seat (Manual)
- Overview. Refer to → Chapter "Front Sport Manual Seat, Assembly Overview".
Vehicles with:
- Seat and backrest heating
- Storage compartment
Power Sport Seat
- Overview. Refer to → Chapter "Front Sport Power Seat, Assembly Overview".
Vehicles with:
- Memory function
- Seat and backrest heating
- Storage compartment
Front Seat, Mounting on Fixture for Seat Repair
Special tools and workshop equipment required
- Engine And Transmission Holder -VAS6095-
- Engine/Transmission Holder - Seat Repair Fixture -VAS6136-
Installing the front seat on the Engine/Transmission Holder - Seat Repair Fixture -VAS6136-.
- The front seat is removed from the vehicle.
- Attach the Engine/Transmission Holder - Seat Repair Fixture -VAS6136- to the Engine And Transmission Holder -VAS6095-.
- Attach the front seat to the Engine/Transmission Holder - Seat Repair Fixture -VAS6136-.

