Audi Q5: Tie-down rings
There are four tie-down rings in the luggage
compartment for securing luggage items.
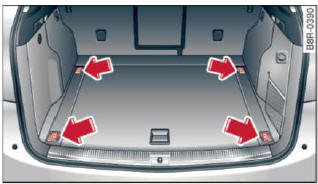
Fig. 75 Location of the tie-down rings in the luggage compartment
- Secure the cargo to the tie-down rings
> fig. 75.
- Observe the safety notes.
- Read and heed all WARNINGS.
WARNING
Weak, damaged or improper straps used to
secure items to tie-downs can fail during hard
braking or in a collision and cause serious personal
injury.
- Always use suitable retaining straps and
properly secure items to the tie-downs in
the luggage compartment to help prevent
items from shifting or flying forward.
- When the rear seat backrest is folded down,
always use suitable retaining straps and
properly secure items to the tie-downs in the luggage compartment to help
prevent
items from flying forward into the passenger
compartment.
- Never attach a child safety seat tether strap
to a tie-down.
READ NEXT:
Fig. 76 Luggage compartment: cover attached
Fig. 77 Luggage compartment: storing the cover
Removing
Unhook the straps 1 > fig. 76.
Pull the cover 3 out of the retainers 2 in the
direction of
You can store dirty or wet objects under the cargo
floor.
Fig. 78 Luggage compartment: cargo floor folded together
with protective tray
Folding the cargo floor together
Lift the cargo floor by the
Description
Additional cargo can be carried with a roof luggage
rack.
If luggage or cargo is to be carried on the roof,
you must observe the following:
Only a specially designed roof rack may be use
SEE MORE:
Removing
WARNING
Follow all Safety Precautions when working with
pyrotechnic components. Refer to
→ Chapter "Pyrotechnic Components Safety Precautions".
Before handling pyrotechnic components (for example,
disconnecting the connector), the person handling it
must "discharge st
Switching on
The cruise control system makes it possible to
drive at a constant speed starting at 20 mph (30
km/h).
Fig. 108 Control lever with push-button
Fig. 109 Display: Selected speed
Pull the Lever to position 1 > fig. 108 to
switch the system on.
Drive at the speed to be controlled.

