Audi Q5: A-Pillar Trim Panel, Removing and Installing
Special tools and workshop equipment required
- Pry Lever -80 - 200-
Removing
- Remove the instrument panel side cover. Refer to → Chapter "Instrument Panel Side Cover, Removing and Installing".
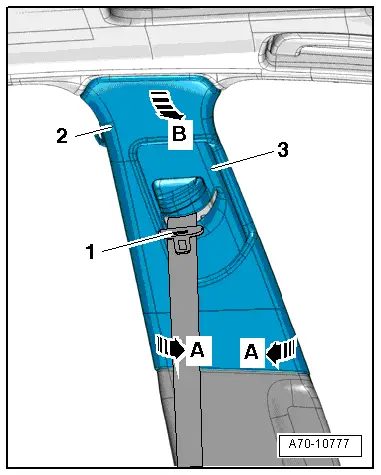
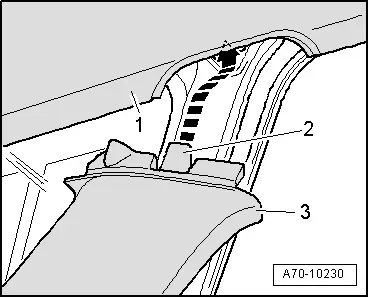
- Remove the gap cover -1- from the A-pillar trim and the sill trim -arrow-.
- Remove the gap cover upward from the clips on the A-pillar.
 WARNING
Follow all Safety Precautions when working with pyrotechnic components. Refer to → Chapter "Pyrotechnic Components Safety Precautions".
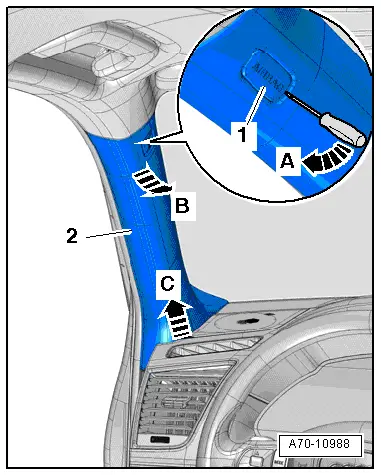
- Pry out the expanding cap -1- with the "airbag" symbol about 5 mm with a screwdriver -arrow A-.
 Note
Note
- The trim be removed from the A-pillar in direction of -arrow B- in different way depending on which clips are installed in the vehicle, refer to → Fig. "Upper A-Pillar Trim Clip".
- If clips with a hook are installed, the trim needs to be pulled just a few millimeters until the hooks engage.
- Carefully unclip the A-pillar trim -2- beginning at the top using a Pry Lever -80 - 200--arrow B-.
- Push the A-pillar trim upward and remove it -arrow C-.
 Note
Note
Depending on the date of manufacture, the clip slides out of the guide on the trim when it is pulled upward.
Installing
 WARNING
- Follow all Safety Precautions when working with pyrotechnic components. Refer to → Chapter "Pyrotechnic Components Safety Precautions".
- Do not pinch the head curtain airbag when installing the upper A-pillar trim.
Install in reverse order of removal. Note the following:
 Note
Note
- Always replace the clips in the center and at the bottom.
- Always replace clips without hooks with clips with hooks.
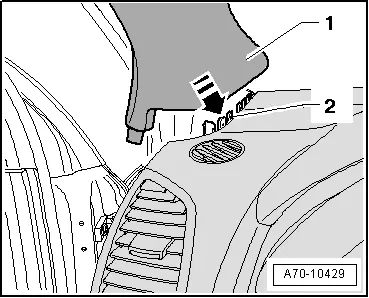
- Install the upper A-pillar trim -1- into the instrument panel mount -2- and the front sill panel trim -direction of arrow-.
- Attach the upper A-pillar trim with the "airbag" symbol so that the clips engage.
- Fold over the rubber lip on the door seal.
B-Pillar Trim Panel, Removing and Installing
B-Pillar Trim Panel, Removing and Installing, Upper B-Pillar Trim Panel
Special tools and workshop equipment required
- Trim Removal Wedge -3409-
Removing
 WARNING
Follow all Safety Precautions when working with pyrotechnic components. Refer to → Chapter "Pyrotechnic Components Safety Precautions".
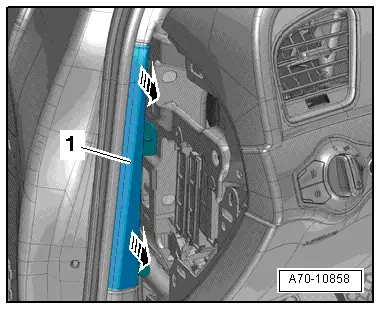
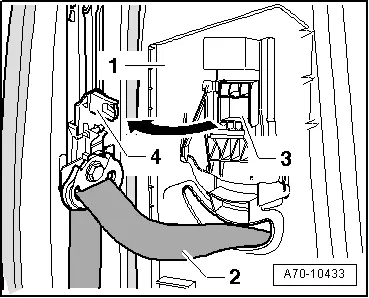
- Press belt height adjuster button and bring height adjuster slide into lowest position.
- Unclip the upper B-pillar trim -2--arrows A- by inserting the Trim Removal Wedge -3409- into the lower edge of the trim.
- Remove the upper B-pillar trim from the bracket on the body -arrow B- by moving the trim toward the inside and pulling it downward at the same time.
- Remove the front belt anchor. Refer to → Chapter "Front Belt End Fitting, Removing and Installing".
- Guide the belt webbing with seat belt latch -1- out through the slide for the seat belt height adjuster -3- and then remove the upper B-pillar trim.
Installing
 WARNING
- Follow all Safety Precautions when working with pyrotechnic components. Refer to → Chapter "Pyrotechnic Components Safety Precautions".
- Do not pinch the head curtain airbag when installing the B-pillar trim.
- Guide the belt webbing and seat belt latch -2- in through the slide for the seat belt height adjuster.
 Note
Note
Ensure that the seat belt height adjuster is in the bottom-most position.
- Make sure the mount -3- for the sliding piece for the upper B-pillar trim -1- is securely latched into the retaining pins -4- on the seat belt height adjuster.
Install in reverse order of removal. Note the following:
- Install the front belt anchor. Refer to → Chapter "Front Belt End Fitting, Removing and Installing".
- First install the B-pillar trim upward into the cut-out in the headliner and into the bracket.
- Stretch the door seal rubber lips over the trim.
- Check the seat belt height adjuster function.
B-Pillar Trim Panel, Removing and Installing, Lower B-Pillar Trim Panel
Special tools and workshop equipment required
- Pry Lever -80 - 200-
Removing
- Remove the upper B-pillar trim panel. Refer to → Chapter "B-Pillar Trim Panel, Removing and Installing, Upper B-Pillar Trim Panel".
- Unclip the front sill panel trim near the lower B-pillar trim. Refer to → Chapter "Sill Panel Strip, Removing and Installing, Front Sill Panel".
- Starting at the top, unclip the lower B-pillar trim -2- from the B-pillar -arrows A- using the Pry Lever -80 - 200-.
- Unclip and remove the lower B-pillar trim from the sill -arrow B-.
- Open the flap -3- and remove the seat belt webbing -1-.
Installing
Install in reverse order of removal. Note the following:
- Install the centering pin on the lower B-pillar trim on the sill.
- Stretch the door seal rubber lips over the trim.
C-Pillar Trim Panel, Removing and Installing
Special tools and workshop equipment required
- Pry Lever -80 - 200-
- Omega Clip Tool -T40280-, is needed to remove any clips are that still inside the body.
Removing
 WARNING
Follow all Safety Precautions when working with pyrotechnic components. Refer to → Chapter "Pyrotechnic Components Safety Precautions".
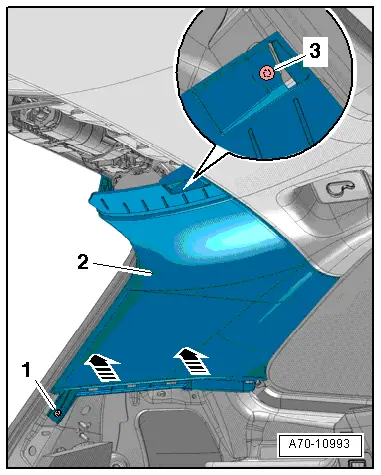
- Remove the luggage compartment side trim. Refer to → Chapter "Luggage Compartment Side Trim Panel, Removing and Installing".
- Remove the rear outer belt guide. Refer to → Chapter "Outer Rear Belt Guide, Removing and Installing".
- Remove the expanding clip -2-.
- Unclip the C-pillar trim panel -1- using the Pry Lever -80 - 200--arrow A-.
- Pull the C-pillar trim downward -arrow B- and remove.
Installing
 WARNING
- Follow all Safety Precautions when working with pyrotechnic components. Refer to → Chapter "Pyrotechnic Components Safety Precautions".
- Do not pinch the head curtain airbag when installing the C-pillar trim.
Install in reverse order of removal. Note the following:
 Note
Note
- If the trim clamp remains in the body mounting points, remove them and insert them in the trim.
- Check the clamps for damage or deformation and replace them if necessary.
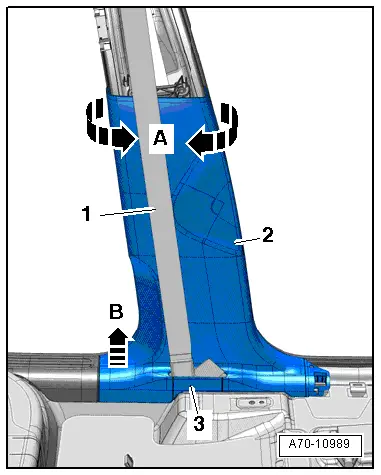
- When installing the C-pillar trim -item 3-, make sure the retaining strip -2- fits into the cut-out in the body -arrow- and in the headliner -1-.
- First mount the C-pillar trim on the centering pins and then press until it engages audibly.
- Pull the door seal rubber lip over the edge of the trim.
D-Pillar Trim Panel, Removing and Installing
Special tools and workshop equipment required
- Pry Lever -80 - 200-
- Omega Clip Tool -T40280-, is needed to remove any clips are that still inside the body.
Removing
 WARNING
Follow all Safety Precautions when working with pyrotechnic components. Refer to → Chapter "Pyrotechnic Components Safety Precautions".
- Remove the luggage compartment side trim. Refer to → Chapter "Luggage Compartment Side Trim Panel, Removing and Installing".
- Remove the rear roof panel trim. Refer to → Chapter "Roof End Strip, Removing and Installing".
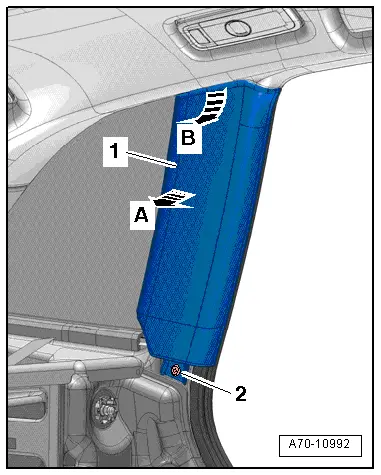
- Remove the expanding clips -1- and -3-.
- Remove the D-pillar trim -item 2- from the body -arrows- using the pry lever -80 - 200-.
- Versions with a speaker: Disconnect the connector.
Installing
 WARNING
- Follow all Safety Precautions when working with pyrotechnic components. Refer to → Chapter "Pyrotechnic Components Safety Precautions".
- Do not pinch the head curtain airbag when installing the D-pillar trim.
Install in reverse order of removal. Note the following:
 Note
Note
- If the trim clamps remain in the body mounting points, remove them and insert them in the trim.
- Check clamps for damage or deformation, replace if necessary.
- Install the D-pillar trim and press on it until the audibly latches.
- Pull the rubber lip of the luggage compartment seal over the edge of the trim.