Audi Q5: Instrument Panel Vent, Removing and Installing
Instrument Panel Vent, Removing and Installing, Side Instrument Panel Vent
Special tools and workshop equipment required
- T-Handle Hook -3438-
Removing
 Note
Note
There is a hole -arrows- on the side of the instrument panel vent at the top for attaching the T-Handle Hook -3438-.
- Carefully remove the instrument panel vent -1- out of its opening alternating from the side to the top using the T-Handle Hook -3438-.
- Versions with lighting: Disconnect the electrical connector on the instrument panel vent.
Installing
Install in reverse order of removal. Note the following:
 Note
Note
Check the clips for damage or deformation and replace them if necessary.
- When sliding the instrument panel vent into the installation opening, make sure the air duct engages correctly.
- Press the instrument panel vent into the installation opening as far as the stop.

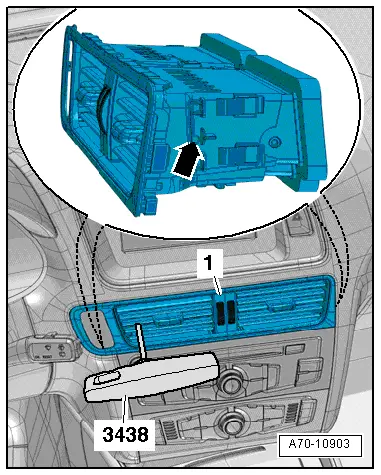
Instrument Panel Vent, Removing and Installing, Center Instrument Panel Vent
Special tools and workshop equipment required
- T-Handle Hook -3438-
Removing
 Note
Note
The instrument panel vent has a hole -arrow- on both sides for attaching the T-Handle Hook -3438-.
- Alternating on both sides, carefully remove the instrument panel vent -1- from the installation opening using the T-Handle Hook -3438-.
- Versions with lighting: Disconnect the electrical connector on the instrument panel vent.
- Version with lighting: to disconnect connector for lighting, remove the MMI screen cover. Refer to → Chapter
Installing
Install in reverse order of removal. Note the following:
 Note
Note
Check the clips for damage or deformation and replace them if necessary.
- When sliding the instrument panel vent into the installation opening, make sure the air duct engages correctly.
- Press the instrument panel vent into the installation opening as far as the stop.
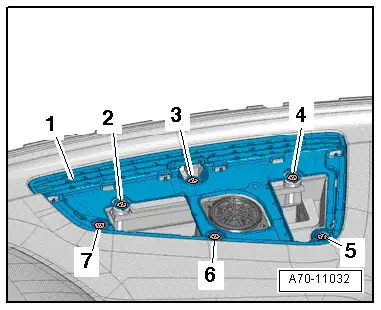
Front Center Defroster Vent, Removing and Installing
Removing
- Remove the center speaker trim. Refer to → Chapter "Speaker Trim, Removing and Installing, Center Speaker".
- Remove the screws -2 through 7- and remove the upper defroster vent in the center-1- from the instrument panel.
- Disconnect the Sunlight Photo Sensor -G107- connector.
Installing
Install in reverse order of removal. Note the following:
- Engage the defrost vent back into the instrument panel into the retaining tabs.