Audi Q5: Roof Bars/Roof Rails
Overview - Roof Trim Molding
 Note
Note
- Note different versions.
- The roof trim strips are not riveted to the body and must be unclipped from underneath for removing.
- Do not twist or bend high gloss trim strips.
- To remove roof trim molding, it is not necessary to remove the side window.
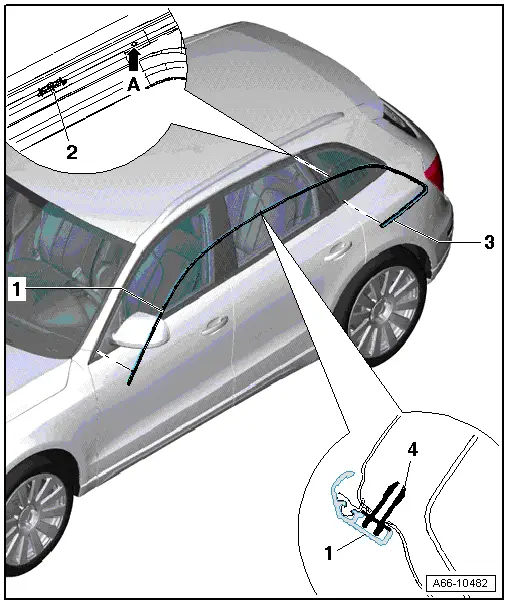
1 - Roof Trim Molding
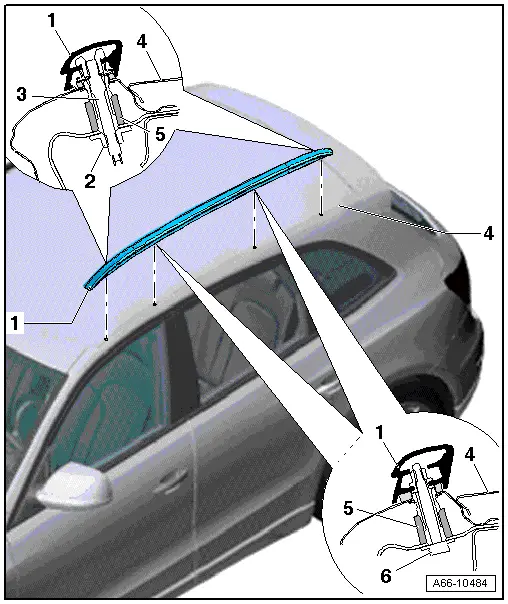
- Standard roof trim molding:
- Unclip the roof trim molding from the top of the vehicle body starting at the "C-pillar".
- High gloss roof trim strip:
- Pull the lower trim strip out of the clips on the "C-pillar" beginning on the side.
- Carefully pry the top roof trim strip out of the clips on the "D-pillar" and side window and unclip it from the body flange.
- Beginning at the "A-pillar", unclip the roof trim strip from the body moving downward.
2 - Clip
3 - Side Panel Trim Molding
4 - Clip
Roof Railing, Removing and Installing
 Caution
- It is necessary to replace all seals whenever a new roof railing is installed.
- If being re-used, install the nuts and screws with locking compound.
1 - Roof Rail
- Removing:
- Lower the headliner. Refer to → Body Interior; Rep. Gr.70; Roof Trim Panels; Headliner, Removing and Installing.
 Note
Note
The Roof Rack Recognition Sensor -G625- is located only in the left roof railing.
- Disconnect the Roof Rack Recognition Sensor - G625- connector.
- Remove the nuts and screws and remove the roof railing.
- Installing:
- Adjusting elements must be pushed into the roof and be in the installation position with slight pretension.
- Place railing on roof and threaded pins through adjusting elements.
- Follow the installation sequence:
- First tighten the screws and then the nuts to the tightening specification.
2 - Threaded Pin
- Pushed into the roof railing at the front and back
3 - Nut
- Replace. Install new nut with Locking Fluid -D 000 600 A2-.
- 10 Nm
4 - Roof
5 - Adjusting Element
- Insert the front adjusting element and both rear adjusting elements into the holes and slide them forward into their installation position.
- Insert the remaining adjusting element (second element shown from the front) into the hole and slide it toward the rear into its installation position.
- Position the adjusting elements so that it makes contact, with light pre-tension of 0.3 Nm.
6 - Bolt
- 10 Nm
- Replacing, clean any remaining locking compound form the threaded hole with a thread cutter.
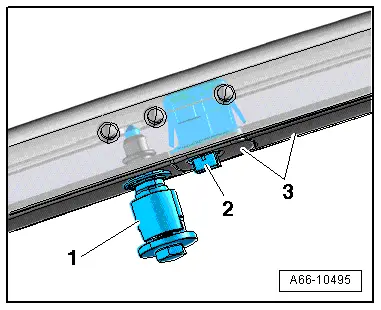
Roof Rack Recognition Sensor - G625-
- The Roof Rack Recognition Sensor -G625--2- is only installed in the left roof rail and can be replaced. Refer to → Brake System; Rep. Gr.45; Component Location Overview; Component Location Overview - ABS/ESP.